
As promised, here’s a little tutorial for how to make these colorful maracas. We’ve already had lots of fun with them, both in making them and using them, and I’m sure you will too. Don’t be put off by the length of this tutorial, it’s not difficult, but it is somewhat time consuming. That’s why I like that I can do it with my kids, so I don’t have to find a bunch of extra time when they’re sleeping to do some paper mache. There are several steps to this process, including some drying time, so don’t expect to get it done all in one day.


- cornstarch
- water
- saucepan and stove top
- paper for making the egg (newspaper, copy paper, etc., nothing too stiff)
- decorative paper (paste paper, scrapbook paper, etc., again, not too stiff)
- water balloons
- scissors or xacto knife
- ruler
- bone folder
- white glue
- beans, rice, or other dry grains, for filling the maracas with
- glitter, puff paint, ribbons, stickers, etc., for embellishing (optional)
How to Make the Paste
What makes this project really child-friendly is the paste (not glue). If you swear by Mod Podge, you could probably use that instead of paste, but I’ve never touched the stuff, so I don’t know for sure. I use an all natural paste that I make myself, and I love it. I got the recipe in a handout in my book binding class, and it’s what I use for all my paper mache projects.
It’s easy to make, only two ingredients: cornstarch and paste. And you can make as much or as little as you want, just remember to use the 1:10 cornstarch:water ratio. When I make this, I find that 1 tablespoon of cornstarch and 10 tablespoons of water makes a good amount. You don’t want to make too much, because the stuff only stays good for about 2 days in the fridge.
Cornstarch Paste
1 part cornstarch
10 parts warm water
- Whisk the ingredients together in a small sauce pan.

- Bring to a boil on medium heat and boil for 5 minute, and then remove from the heat. The mixture will go from milky/cloudy to thick and translucent.
The paste will only stay runny for a little while, and then it will start to thicken and gel. This isn’t a problem, it works both runny and thick, you just have to work a little harder to moisten the paper and spread it on when the paste is thick. So it’s usually best to be ready to use the paste as soon as you make it.
The advantages of using this paste over other adhesive options is that it is very affordable (practically free) and that it is completely nontoxic and washable, so you don’t have to worry about your kids getting on their hands and everywhere else (though I’d try to keep it out of your carpets).
Of course, if you have another paper mache paste you’d prefer, feel free to use that instead.
Making the Egg Shapes
Sorry, I was a little sparse on the pictures for this step.
- First you’ll need a form to paper mache onto to give you the shape you want. In this case, I used water balloons (inflated with air, not water).
 You don’t need this many, but my little girl loved playing with them, rubbing them on her hair and making them stick to the wall, so you may want a few extra, for entertainment purposes.

- (This is the only picture I have of making the initial egg shape.) Basically all you do is moisten little squares of paper in the paste (don’t have it globby or thick, you only want a thin layer) and stick it onto the balloon. Make sure to overlap the edges of each piece of paper a little.
- Once you’ve cover the whole balloon, leaving only a nickel-size whole where the balloon is tied, you’ll want to do another layer. You’ll want at least 2 layers, depending on the thickness of your paper. I used a paper that was a little thicker than printer paper, so two layers was fine, but if you’re using newspaper I’d do 4 or 5 layers. Also, if you are not using another layer of paper to decorate your maraca, you may want to do one more base layer.
- You don’t have to let it dry before putting on the decorative outside, but I did, just to make sure it was strong enough. If there are weak (soft) spots when your egg dries, add another layer or two.


Once you are sure you egg is hard enough, you’re ready to decorate.
Decorating the Egg Shapes
I chose to decorate the top part of my maraca before filling, sealing, and attaching the handle because I wanted to make sure no moisture would seep in and spoil the grain/beans inside. You can use whatever you want to decorate your maraca. You can paint them or dye them, but I chose to use more paper. You can use any kind of decorative paper, as long as it’s not too stiff (really stiff paper will have trouble conforming to the curve of your maraca).
I used paste paper, because I love it and I have lots of it. If you’re feeling ambitious, you can make some paste paper using my tutorial here. It’s a fun project all by itself.
- I tore my paper into strips and then into squares as I went. You only need to make one layer with your decorative paper.

- I added the white accent papers at the very end, but you can do all of the decorating now, just remember that you will be covering over a small area near the opening in your egg when you attach the handle, so don’t put anything there that you don’t want covered up.

Once you get it all covered, let it dry. 
Filling the Maracas
- If you have a funnel, you can just use that. But if you’re like me and have only limited kitchen supplies, you can make a quick funnel out of a scratch piece of paper by rolling the paper into a cone, leaving a small opening at the end, and taping the side so it keeps its cone-shape.

- Insert the small end of the funnel into the opening in your egg, and pour about a tablespoon of some dry grain or beans into your egg. I used a different substance in each of my maracas.
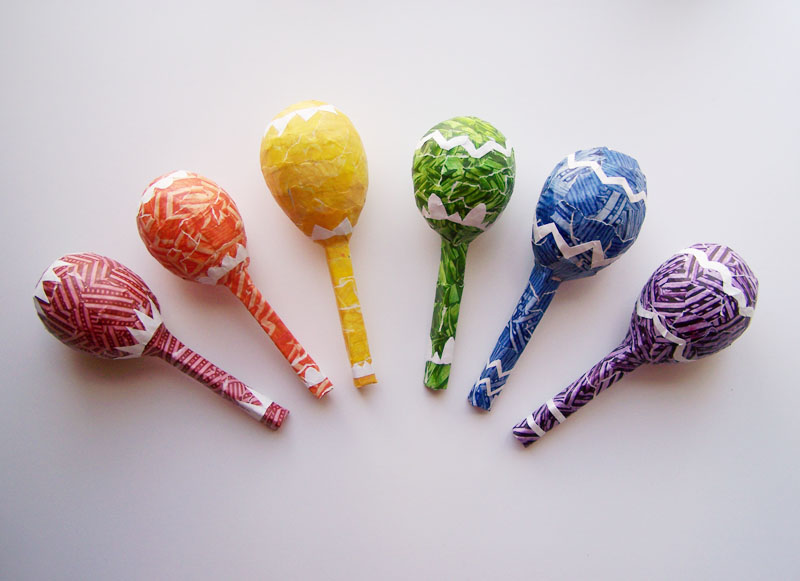
 From left to right: garbanzo beans, popcorn, pinto beans, black-eyed peas, lentils, and rice.
I thought the popcorn and the rice made the best sounds, but you can use whatever you have, as long as it’s not perishable. - Once you have your material inside your egg, keep it propped upright in a cup or a jar so the beans will keep away from the moisture in the next step.
- To seal your egg, cover the whole with a square of paper coated in paste. Make sure not to tip your egg or let the beans come in contact with the wet paper.


Attaching the Handles
I used a rolled triangle of cardboard to make my handle. I waned a good, solid handle, and this shape seemed to work pretty well.
- Start by cutting out a long rectangle from o thin piece of non-corrugated cardboard (you could use an empty cereal box or the like). Draw vertical lines that divide the rectangle into 4 equal strips, and score the cardboard along those lines.
- Fold the rectangle along those lines, and form a triangle (the cardboard will overlap on one side).

- Glue (not paste) along the side that overlaps, and let the handle dry.
- When you’re ready to attach it to the egg shape, wrap a piece of paper moistened with paste around one end of the handle so half is on the handle and half extends off the edge of the handle. Snip down each of the three corners of the triangle on the paper to where it is on the handle, and fold the sniped paper back (see the picture, sorry this is confusing!) so it forms a flat end on the handle.
- Stick this were you sealed the egg (you may need to apply a little more paste if it has started to dry at this point). Again, try to keep your beans or rice away from the moist area.
- Lay more paper down over the flaps of the handle and up the side of the handle to reinforce the joint. You’ll want 2–5 layers of paper here, as before, plus one decorative layer.
- Cover the rest of the handle (including the open end) with paper and decorative paper.
Finishing Touches
You may want to add more decorative elements after your maraca is assemble, but remember not to get the egg part wet enough that moisture will seep through to the beans on the inside.
 Here’s a few examples of how I decorated mine. There are so many possibilities, so be creative.

 Now you’re ready to make some music.

Have fun!

Pingback: Cinco de Mayo Party DIYs « M&J Blog