Drawing Again

So, I’ve been drawing again. Just started up this week. Again? You might be asking yourself. Well, you see, way back when I started this blog (almost three years ago, yikes!) I had the grand and glorious idea of this being kind of an artist journal. Well, an aspiring-artist journal. But it has kind of morphed and evolved since then into this different kind of a thing. More of a craft blog, I suppose. But behind the sewing and what not that I usually show on the blog, every now and then I do real, legitimate aspiring-artist stuff. To be honest, though, it’s been a while. On Monday, after months of almost no drawing of any sort, I started drawing again. Just an hour a day, sometimes a little more, if naptime permitted. And it’s been five days now that I’ve been drawing. My usual routine, when I’m trying to work my skills up again, is to do a little free doodling, and then a more focused self-portrait. Here are the self-portraits for the last five days.

faces
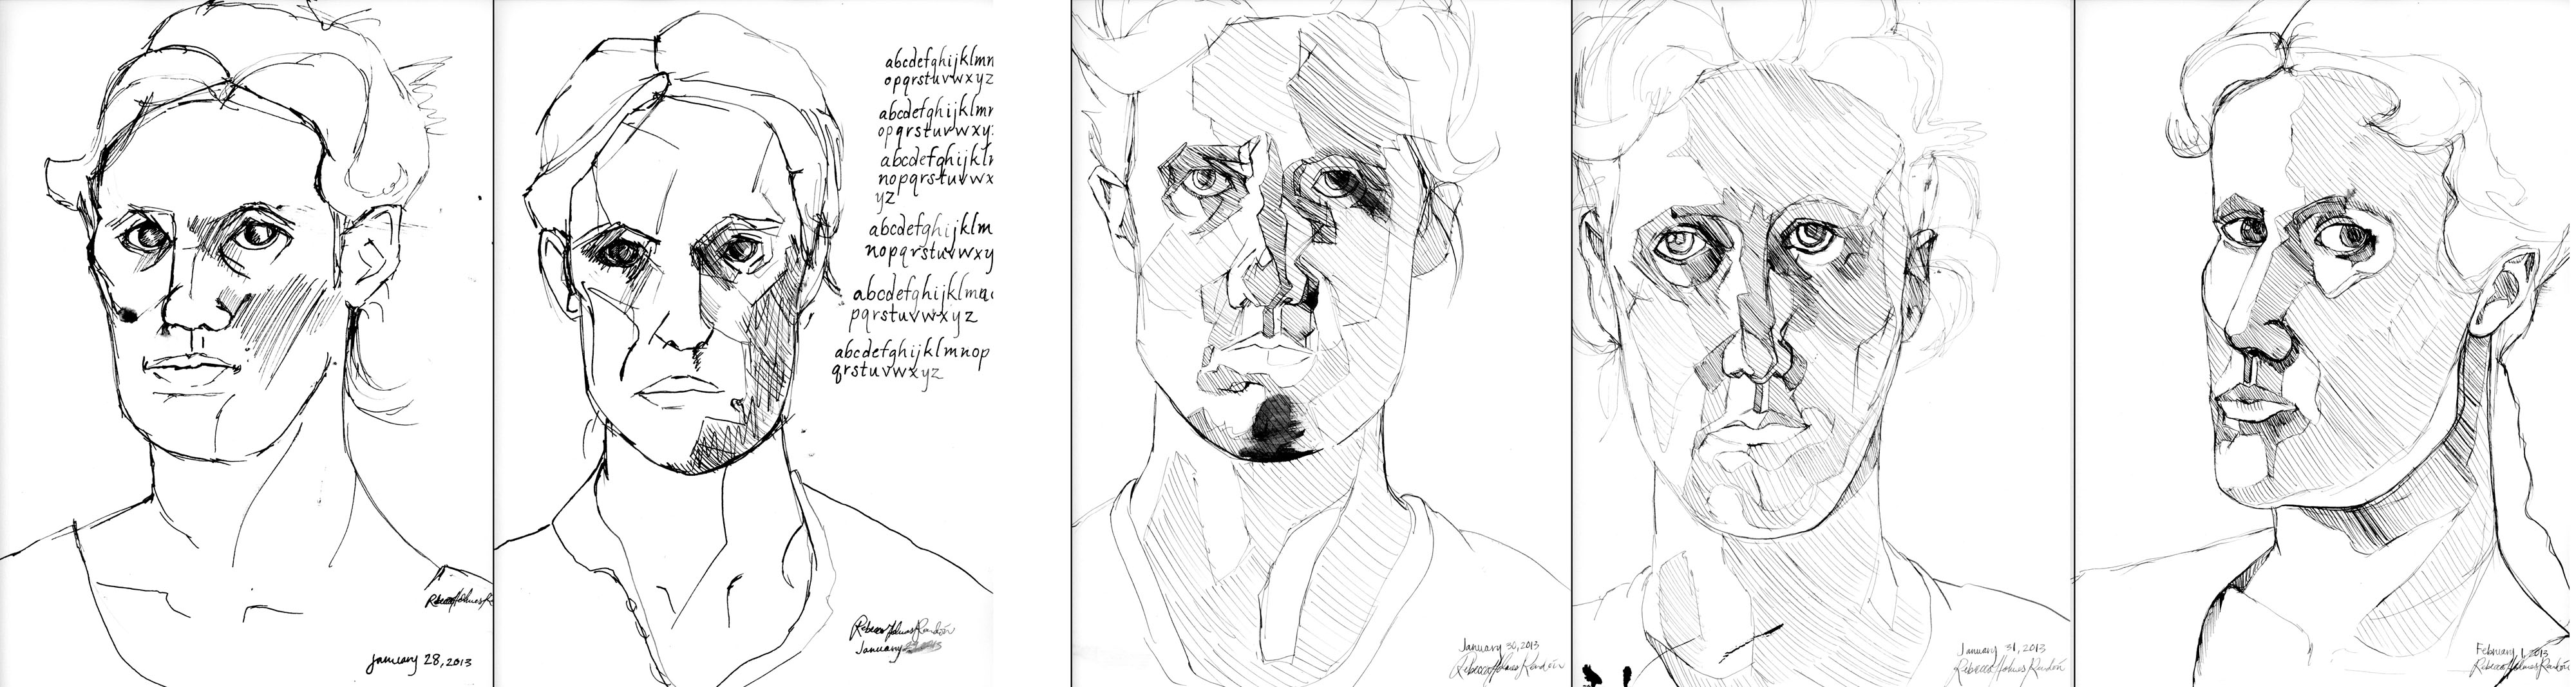
As you can see, the beginning was rough. I mean really rough. I wasn’t even planning on showing these, because they’re a little embarrassing, but when I got to today and lined up all five drawings, I was quite impressed with the progress I had made in such a short amount of time. So I thought I would share, in case it might inspire someone else to give drawing a chance. Toddlers permitting, I’m going to try to keep doing a self-portrait every day, for the next little while (a month, maybe?). If I can keep this up for a month, I’ll share the results again. Hopefully I’ll see even more progress then. Would anyone care to join me? If so, here are some basic suggestions:

  • Sit in front of a mirror and draw yourself from life. It may be more challenging than a photograph, but it helps train your eye to translate 3 dimensions into 2. When you work from a photograph, the camera has already done that for you.
  • Try to draw with natural light as much as possible.
  • Don’t expect every day to be a masterpiece. Just keep working at it, and over time you will see improvement
  • If you’re getting bored, try a new medium. Pen and ink work a lot differently than pencil.
  • Have fun with it.

If you do some self portraits, I’d love to see. You can leave a link in the comments to this post, if you’d like.

Have a great weekend!

2-in-1 Tutorial: The Book Sweater and How Not to Write a Tutorial

I like to read, but I don’t have a lot of time for it. It’s hard for me to sit down with a book when my crazy toddler is running amok and my baby is needing attention, besides the fact that I am always thinking of things I need/want to be doing instead (need to clean, want to create).

I do listen to audio books a lot while I do dishes, fold laundry, or work on projects. It’s how I got through War and Peace, Anna Karenina, The Brothers Karamazov, and Crime and Punishment in one year (this definitely would not have happened if I’d have had to sit down with each of these hefty tomes).

But there are some books that I still need to sit down and read, either because they’re not available as an audio book, or they are the kind of thing I like to mark up for later. With these books, I often find myself lugging them around and trying to read them in little snippets while waiting for doctors appointments, long car rides, or at other things that involve sitting and waiting. But a diaper bag is a dangerous place for a  book, let me tell you. At least mine is. So I decided to make a little pouch to protect the books I carry around with me. Nothing fancy, but plenty handy.

So without further ado, here it is:

  1. Start by felting a wool sweater. You may already have a sweater that you accidentally felted in the wash, but if not throw a 100% wool sweater in your washing machine with hot water and soap. I threw mine in the dryer, too, but some people say this is bad for the wool, so do this with caution. It may take a couple washes for the wool to be felted enough.
  2. Cut apart your sweater along all the seams, unless you want to work the seams into your design.
  3. Lay your chosen book down on your chosen book on the largest part of the sweater. You want enough to go around the sides of the book at least an in on three sides (leave more space if you have a really thick book or want to make it for several books) and enough on the fourth side for a flap that will be tucked in.

    (By the way, I recently read this article and I had to smile at my inadvertent “product placement,” since I took these pictures months ago and this was honestly the book I want to tote around with me in my diaper bag.)
  4. Cut another piece the same width as the first piece, but this time without the extra length for the flap (so that is 1 inch extra around each side of the book).
  5. Trim the edges of your pieces so they are pretty much square.
  6. That was the last “process” picture I took, so sorry if I lose you after this. My top piece was cut from the front of the sweater. It was a button-down sweater, and there wasn’t a piece large enough to make the top piece, so I sewed 2 pieces together and then sewed a strip of fabric with the edges turned under over the seam to cover it.
  7. Then I sewed the two pieces of wool, right sides facing each other, together, with a 1/2-inch seam allowance.
  8. Then I just turned it right-side out and pressed it.

I was going to sew buttons on, but I decided that tucking in the flap was just as good, and it saved me the trouble of trying to sew buttonholes.

In case you were wondering about where this wack-a-doo tutorial came from, here are some instructions that you will definitely not want to follow when you’re writing your own tutorial.

How Not to Write a Tutorial:

  1. Start by choosing a technique that you don’t know anything about and have no business explaining to others (in my case, sewing).
  2. Skip the planning phase, just jump right in there and get making.
  3. Take random pictures of obvious and/or simple steps and neglect to photograph the essential, tricky, or less obvious steps (see my examples above).
  4. Realize you cut your material too small (or that you didn’t have enough to begin with); try to “make it work” with some random piecing.
  5. Get hung up in some of the logistics and stop taking pictures altogether because you’re just so frustrated with the dumb mistakes you are making.
  6. Liberally apply your seam ripper to all areas of the project.
  7. Consider giving the dumb thing up as a lost cause.
  8. Force yourself to finish it because you already spent 4 hours on it, and you want something to show for it.
  9. Realize that anyone with basic sewing skills would probably be able to figure out how to make the thing by themselves.
  10. Decide to piece together a tutorial anyways, just for fun.

Anyone had a project that went like this (even if you weren’t trying to write a tutorial for it)?

April Critique Group, Rebecca Rendon

Yes, I’ve finally gotten around to photographing my stuff. The quality isn’t great, though, for which I apologize. I just thought that if I keep waiting until all the conditions are perfect for me to get these pictures done, then I would never share any of my work. Also, I have to admit that none of the following are finished pieces. As I mentioned previously, the last few months have been hard. So working in my studio hasn’t really been happening. Sad, I know. But I haven’t given up. I decided that if I waited until I had some really awesome finished pieces to show you, it would never happen. So I decided instead to post little snippets of different things I’ve been working on and different directions I’ve been exploring. Here is a random sampling of what is lying around my studio (sorry I don’t have dimensions, but everything is pretty small (no more than 15″ by 15″).

Photo Collages

Square collages (1-inch squares of watercolors)

Watercolor Collages

(I took this one on a dark table, so the brown on the edges isn’t supposed to be there, but I kind of like the contrast on the left side it offers. Maybe I’ll add another piece like that.)

In my work, I am trying focus on geometry, color, and texture to create beauty. The problem I run into is my work being “merely decorative.” I do want to imbue my work with meaning, but that is a challenge for me since I work with predominately abstract imagery. I’ve contemplated collaging in representational drawings, transfers, or watercolors, but I haven’t gotten it to work so far. I have recently added stitching as one of my collage elements. What do you think about it? Does it work at all? Also, I am trying to move towards making my paintings 3 dimensional (literally), but this is more difficult than I had anticipated because the supplies for that are hard to come by / work with. Do you think these pieces need more of a 3 dimensional element, or do they work fine as flat paintings? Any impressions, suggestions, or general comments will be appreciated. Sorry I don’t have anything really definite to show. Thanks!

April Critique Group, Sarah Lewis

Here is Sarah’s work for this month.

Orchid Composition One
oil on canvas
24″ x 18″
April 2010

Orchid Composition Two
oil on canvas
24″ x 20″
April 2010
About theses pieces, Sarah says: “I decided to try approaching my paintings this month with a more realistic approach. However I’m wondering if there is something I could add to my paintings to leave them more open for interpretation rather than being so straightforward.  I’d really like to get input in that.”
Thanks, Sarah, for contributing this month! Sorry it is so late.

Whitney Lewis Johnson

Whitney graduated with a BFA from Brigham Young University last year and is currently living in California. She has her own artist blog here. I am really impressed with how much she has gotten done, and I want to emulate her work ethic. Here are two of her pieces that she has done recently:

Fortification, 11×11 inches, oil on canvas

Whitney’s comment about this piece: “This painting is my interpretation of the lessons I learned from the “war chapters” in Alma. The Nephites spent so much time fortifying their cities to protect themselves against the Lamanites, and I feel like there are so many things we can do in our personal life to protect us against the evils of this world. I’m still trying to figure out how to finish this painting. Any suggestions? I’ve been wanting to use more color in my work, but I can never decide which color to use or how to apply it.”


Past, Present, Future, 12×12 inches, oil on panel

Whitney’s comment about this piece: “The concept behind this painting is that before we came to earth, while we are here on earth, and even after our life here on earth, there are eternal principles that remain constant–specifically our agency and power to choose for ourselves, and also our level of intelligence that continues with us from one phase to the next. I thought this painting was finished but now I’m not so sure. It may be a color issue again (not enough color).”