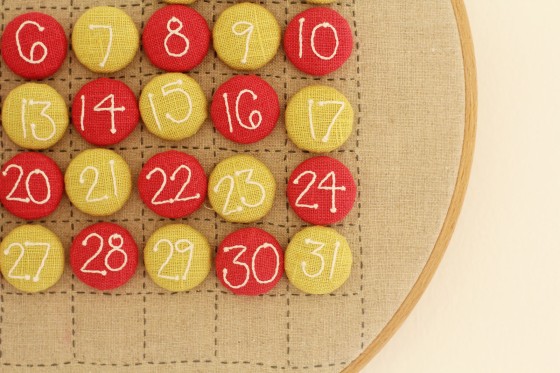
Perpetual calendar

I had planned a different post for today, but since my internet connection is making the tortoises here look fast, I’m just going to settle with this post that I had saved from a little while ago.

This is a project that I’ve been thinking about making for a long, long time. I have lots of those. So I was glad to have a reason to finally get it whipped up.

calendar 1

It’s a perpetual calendar. The little numbers are magnetic and can be moved around to form any 28, 29, 30, or 31 day configuration.
pieces 2

close up

I’m not going to lie. It was a lot of work; more than I was expecting, but now I have a calendar that I can use for years (and years) to come. So hurray for that. 

I was thinking, originally, of making a tutorial for this, but after I got through the 50th step or so, I decided that I would probably be the only one crazy enough to make such a labor intensive little thing. Also, there are still some kinks I want to work out on it. So no tutorial, sorry. But if you’d like some templates for the numbers or the lettering for the months, just leave  comment and I’ll get those to you (keep in mind I only get on the internet for a couple hours every week, so it may take a few days for me to respond. Sorry for the inconvenience.)


Have a great day.

Dolls for Christmas

dolls sittingThis is my very first finished project of 2013. Never mind that I started it way back last year. I really wanted to make some dolls for my girls for Christmas. Last Christmas they got a some dolls from their abuela that they loved to pieces, literally. Like, the legs fell off of one, and the head fell off of the other. I wish I was kidding. And after watching my poor baby walking around cuddling, cooing, and shooshing a headless doll for a couple months, I decided I needed to take some action. So I made these (hopefully) sturdier dolls.

girls smiling

Now, this could have been a simple project. There are tons and tons and tons of thorough tutorials, books, and patterns for beautiful dolls out there. I even took advantage of the the wonderful public library system to check out some books on doll making techniques. But when it came down to it, I decided that I wanted to make my own pattern for my doll. And I wanted to stuff it with wool. And I wanted to do some of that cool, Waldorf-doll style hair. Like I said, this could have been a simple project. isa playing with hair

doll  2

But as my husband often reminds me, if it isn’t difficult, I won’t do it. Sometimes I think he’s right. So, I used some of the very, very helpful information on one of my favorite blogs, While She Naps, to draft a basic doll pattern. And then another one. And then a third one. After three prototypes (thankfully done in muslin) I decided I’d had enough and would have to go with it. If I ever make more dolls, I’ll definitely want to refine it a bit. It was a great learning experience, though.

And, of course, I decided to purchase a raw wool fleece from ebay to stuff the dolls with. Hmm, I think I’ll just breeze through this whole phase of the doll preparation phase, but lets just say there was so much washing, and culling plant and fecal matter from the fleece, and then drying, and then more sorting, and then combing/fluffing. Bottom line, buying prepared wool is probably worth the extra cost.

After assembling the doll bodies, I had to decide on the faces. Several sketches were thrown out before I decided to kind of wing it as I stitched. I fairly well like how the faces came out. I did the pink lip face first, then the smile face. I had intended to go back and redo the pink lips as a smile, but my four-year-old saw the pink lip doll and wouldn’t let me change it.

all together

When it came to the clothes, I did a very simple dress, but I got a little fancy with the decorative stitching on the hem. First time, and it felt good.
close up dress

more close ups

For the hair, I used some lovely organic cotton yarn which is super soft, but a little fragile, so I had to tell my girls not to try combing the dolls hair. They were a little disappointed with that, but they like having me do braids and other hairstyles on their dolls (since they won’t let me do it on them).

faces

dolls by trees

underwear

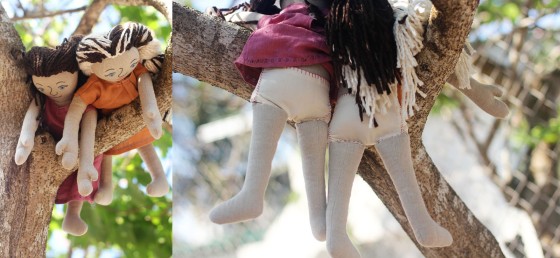
Oh, and I stitched on a pair of underwear for both dolls, so there wouldn’t be any doll indecency should they choose to climb a tree or swing on the swings.

doll love

twoSo far the working names are Tully and Sally, but we’ll see if that changes.

If you have any questions about the process, I’d love to share my beginner’s perspective with you. Does anyone else have any first-time doll-making experiences to share? I’d love to hear.

Have a great day!

Felt Modular Storage

If you were to skim through my archives, you would probably see that it’s no secret that I love felt. Let me get that straight. I love 100% wool felt. I’m a felt snob, I guess. I think it is one of the most perfect creative materials ever to come into the hands of man.

Before I left for the island, I stocked up on some really wonderful 100% merino wool felt (I used some of if for this project). And now that I have some time and  great little studio space, I’ve been dreaming up ways to use it up. One of the first that came to mind was some storage space for the never ending supply of little things that find there way onto my desk. Pencils, scissors, thimbles, etc., that just never want to stay in their designated drawer, no matter how often I put them there.

So I came up with this.

It was a lot of hand sewing, to which the callouses on my fingers can attest.

I figured out, half way through, that some rubber finger tips made the job go easier, but it was still pretty tough.

I even broke one of my favorite curved needles, which made me sad.

But all the work and pain was worth it. I love it.

I played around with the arrangement, and finally decided to go with point-side down (though, if it had been a little more practical, I would have totally gone with the leaning side position).

This is made with scraps of 5 mm felt. It seems pretty sturdy. I would have made it bigger (meaning, adding more triangles the same size) if I had more big scraps. Maybe I’ll have to pick up some more felt while I’m in the states.

Have a great day!

Murder Your Darlings: Musings on the Creative (and Destructive) Process

(***I started writing this post a while back, but got caught up in a lot of other tasks, and never got back to it until now. Imagine this as being written before I moved to the island.)

In preparation for an anticipated change in location, I have been trying to whittle down the hoards of things I have amassed over the last seven years since I left my childhood home and entered the world of adulthood. Coupled with this sorting and decluttering was a small personal failure. Nothing earth-shattering: I worked on a piece, and entered it into a juried art exhibition, but I didn’t get in. Obvious truth: it is hard to face rejection. It is hard to put yourself on the line and then get shot down. And it doesn’t feel encouraging at the time. But, cliché as it sounds, rejection is helpful at times. If you decide to learn from it, that is.

The first semester after I got married, I took a ceramics class as part of the undergraduate studio art core. I loved that class; I loved the things that I made. I am not a sculptor, so I had no pressure, no expectations. So I just played around If I made something terrible, I could just take it as a lesson learned, and move on. This wasn’t my major, after all. The teacher completely supported this exploration. And she loved the stuff I made. In her eyes, I could do no wrong. Now, while this kind of freedom and encouragement is wonderful, it can also lead to a little bit of pride in the creator. Everything I did was great, deep, meaningful, avant-garde, and all the rest.

It was just at the point in my artistic development when I was beginning to explore abstraction. Now, abstract art does require talent, skill, inspiration. But abstract style is easy to fake. This makes it tempting to just throw something together and call it abstract art.

All these things can combine to lead to genius syndrome: the artist is paramount, her ideas are superb, and anything she says goes. Bottom line: not the best way to objectively look at and evaluate a piece of work. That was my problem.

“Whenever you feel an impulse to perpetrate a piece of exceptionally fine writing [or, in this case, art], obey it—whole-heartedly—and delete it before sending your manuscripts to press. Murder your darlings”. Sir Arthur Quiller-Couch.

I first heard this quote in a creative writing class, and it’s been lulling around in the back of my mind, surfacing now and then, ever since. As a creative person, I find that it’s the kind of thing that can haunt you. After all, you don’t really want to murder your darlings, do you? Maybe you don’t grow too attached to things. I do.

Anyways, back to my class. For the final project in my ceramics class, I did some big hollow organic shapes. At the time, I attached all sorts deep, important meaning to these pieces. I can’t quite recall all that fluff now. Really, they were just knobbly, awkward blobs. Big and moderately skillfully made, but blobs nonetheless. My teacher and classmates were impressed, and I therefore concluded that these pieces must be impressive. I was proud of my work, proud of how clever I was.

Fast forward 4 years, 3 moves later, and I still had these bulky blobs boxed up with newspaper and packing peanuts. When the possibility of moving now thousands of miles away presented itself, I decided it was time to make some deep cuts into the store of stuff we had accumulated over the years. Out came the three big boxes, unopened since they had been packed up 3 years previously. I tore into the boxes and freed them from their paper winding clothes. There they were. My darlings. The evidence of my genius. Somehow, I had remembered them much more excellent than they now appeared. (It didn’t help that some of the glaze had chipped off where I had applied it incorrectly.)

But even still, I was reluctant to let go of my darlings. Quite to opposite, in fact. I caressed their surfaces, remembering how I had labored over them for hours to beat them into those awkward shapes. I nestled them together, remembering how much everyone had liked them grouped together.

On a whim, I snatched my favorite (not pictured) from the midst of them, gussied it up a bit, and whisked it off to submit it to a juried art show. The rush of entering a show quickly waned, however, and by the time I got home from submitting my piece, I knew I had made a mistake. I had not looked at that piece objectively. Even after four years, the accolades from my teacher and peers in that little beginning ceramics classroom still rung in my ears, and drowned out my soft inner voice that was whispering, “you know, this isn’t really that great, after all.” It only took a week to get the official rejection from the show.

About a year ago I read a blog post about someone burning one of her quilt tops because it didn’t turn out the way she had hoped it would. I had wondered what it would feel like to destroy your creations in such a violent manner. So I did it. I murdered my darlings.

Reader, it felt good. Besides the obvious cathartic release that comes from smashing large things, I was finally able to understand what it was about these pieces that had been holding me back, and that I was still experiencing with my work now.

Here’s what I learned:

  1. Look at your work objectively. Ask yourself these questions:
    ♦  What are its merits?
    ♦  Is it skillfully done?
    ♦  Is the idea behind it fully developed, or is your idea still vague in your mind or in your work?
    ♦  Are there things about it that are less than excellent?
    ♦  Would you call this your best work? If not, what needs to change?
  2. Take a step back from your work, literally and figuratively. Seeing your work from a distance will help you see it more clearly, and giving yourself some time away from your work will help you reevaluate how things are going.
  3. Don’t let your objective eye be blinded by praise, no matter where it comes from.
  4. Don’t get so caught up in the genius or cleverness of your idea that your execution of the idea suffers.
  5. It’s your brain child, not your actual child. Don’t make your work so precious that you can’t bear to ax it if it just isn’t working out.

All of this may seem pretty obvious to you. You probably all learned these lessons long ago. And that’s fine. Good for you. I wrote this post for me. And it wasn’t easy. But now that it’s done, I feel a lot better, as if this learning experience I started so long ago is now finally sorted and solidified in my mind.

Thanks for listening. I’d love to hear your thoughts.

Ecuador Days 10 through 12

Days 10:

These next few days were spent listening to a lot of whack, whack, whack, WHACK. Yes, that’s the best description I’ve got for the sound of lots and lots of hammering, with some sawing and chiseling thrown in there too. That’s the sound of a power-tool-less construction project going on. I am so impressed with my husband, not only because he made a chicken coup, and chicken casita (little house), but also because he was able to make it work in very primitive working conditions.

Seriously impressed. The finished product is very a nice little home to seven (soon to be 14) little chickens. The house is complete with roosting poles, a little ramp, and some shelves for the chickens to nest on.

Of course, Papi’s little helper was very busy the whole time. She had a little miniature hammer and some pliers with which she was busily “working.”

Our conversations went like this for most of the days: Me:”Come do [this or that]. My two-year-old: No mami, I can’t, I’m working!

Day 11:

We took a break from the hard work to go to visit my husband’s grandmother: Mami Olga as everyone calls her. Both the girls were pretty shy at first, but eventually the warmed up to her.

Of course, Mami Olga’s cat was the favorite of the visit, until the very-pregnant feline lost her patience with them.

My poor girls; they always love animals way more than the animals love them. So sad.

Mami Olga lives about 2 blocks from the beach so we walked down to see the ocean.

If I were sending out Christmas cards, this would be the photo. Well, maybe not.

We stopped by the “Shopping” (the mall) to get some things, and I couldn’t resist taking this photo.

It is awesome for so so many reasons.

Day 12:

This day started off great with yummy food. A papaya smoothie (with fresh papaya curtesy of the tree in the back yard) and encebollado, which is a really delicious soup featuring fresh tuna and yuca root.

By the afternoon, though, I was beginning to lose my mind a little with all the hammering from the chicken coup construction, so I went on a quick shopping trip with my sister-in-law and my older girl, who is completely enraptured with the whole bus system (fortunately she has been able to block all the memories of her throwing up on them the last time we were here!). I’m still not up to shopping by myself; I’m worried I’m going to get totally ripped off on prices (bad), lost (worse), or robbed (worst), but who knows, I might get the courage to venture out on my own one of these days. It happened to be a Wednesday, and that means all the produce is 25% off, which means I really went to town in the veggie aisle. I was most excited about my 10 artichokes (!) (which, by the way, happen to be the best artichokes I’ve ever tasted, hands down) and 7 great big avocados, but I also got mangoes, apples, plantains, onions, tomatoes, potatoes, oranges, and peppers. And I only spent about $20. The bus ride home was less fun for my little girl than the way there, but we made it home with all our bags and no car sickness, so it was a definite win, overall.

Here’s the finished coup, in case you were wondering:

Tutorial: Lacing Softies

My little girl always asks to “sew” when she sees me doing my embroidery. If she finds my hoop, she will often make a few giant stitches of her own. She’s a little too young to handle a real hoop and needle, so I wanted to make something she could work on, too.

I’ve seen those sewing cards, but since I don’t have access to power tools, little wooden things are not an option. My solution: make it out of fabric.

Would you like to make your own lacing softies for your little ones? It’s pretty simple and straight-forward, but it does require some specific tools and some time. The results are totally worth it, though.

Supplies:

  • Hammer
  • Eyelets/grommets (if you check the definitions, the distinction is rather fuzzy, but in the store the box I got said “eyelets”). I used 5/32″ eyelets.
  • Fabric and whatever you need to put your design on it, (thread, ink, stamps, etc.)
  • Batting
  • Cardboard
  • Hole punch (the kind you hold with one hand and hammer with the other hand)
  • Sewing implement (yarn, blunt needle, shoelace, ribbon, etc.)
  1. Design your softie. You can use whatever means you want to get an image for your softie—a freezer-paper stencil, stamps, silk screening, large printed fabrics, etc; for this one I embroidered the image I wanted (a fox** in this case).
    You can do a front and back image, like I did, or just a front image if you like. If you do a front and back image, you’ll need to make them mirror images so that they’re not backwards.
  2. Turn your image over. If you can’t see it on the back (i.e., the back of the stitches), then place your fabric over a light table, window, and trace the outline with a fabric marker or pencil.
  3. Set some 1/4 in grommets around the outside of of your image where you intend to have them, about 3/4 in apart.
  4. Trace an outline around the grommets with a fabric marker or pencil  (I used a pen so you could see the line). This outline is the line you will sew on, so you do not need to include seam allowances. 
  5. Layer the two pieces of fabric with your design on them together, right sides facing. Use a light table or window to see that your front and back design match up. Pin these two layers together, with a layer of batting behind them.
  6. Sew all the way along the line (I used a free motion foot, but a regular foot might work fine, depending on the design), leaving an opening for turning out.
    (I wasn’t going to show you this, because my free-motion stitching is bad, but it worked okay, so don’t worry about it too much.)
  7. Cut your piece out, leaving 1/4 in seam allowance.
  8. Clip and curves/trim corners if your design has them, and then turn your piece right-side out.
  9. Tuck in the opening and slip stitch it closed. If you need help with slip-stitching, I’ve got some instructions on it in my fabric puzzle tutorial.
  10. Add the eyelets. (If you’ve used eyelets/grommets before, you can skip these instructions, but this was pretty much my first time, and I learned some things that might be good to know before you try it.)
  11. Use a punch to cut a small hole for each eyelet. You will want a cutting board, scrap piece of wood, or piece of thick cardboard underneath you fabric to make sure you don’t make holes in your work surface. (ahem.) I’m using a punch that was about half the diameter of my eyelet hole. Not ideal, but when I tried the punch that was the same size as the eyelet hole, I found that the fabric did not always get caught by the eyelet’s edge when it was pounded down, so it’s better to have to push and wiggle to get the eyelet to fit through a snug hole than to have too much room. I also tried punching a hole and then doing half another hole, overlapping the first one, to make the diameter a little bigger, and that seemed to work pretty well.
  12. I quickly learned that a tap tap tap tap approach worked much better than thud thud thud. I ended up with a few misshapen eyelets before I learned this lesson.
    Also, be sure to tap directly perpendicular to your eyelet setting tool, or it will go on at an angle and not catch all of your fabric (I also learned this lesson the hard way).
  13. Try to push your eyelet through the hole without fabric overlapping the edge of the eyelet, this will help the back stay neater.
  14. Keep setting eyelets all the way around until you’ve done them all.
  15. Choose your sewing implement. I went with yarn and a large, dull needle, but you could use a thin ribbon on a needle, a shoelace, etc.With the yarn, I started with a pretty long piece, and sewed it all the way around to make sure it would be long enough before I cut it off.

Once you have your sewing implement, you’re done. I couldn’t wait to share this with my little sewer (yes, it’s a word).

I don’t know about you, but there is something about those chubbly little fingers holding an oversized needle that is just too adorable (and yes, my daughter is sporting a snow hat at the end of July).

I’m not going to lie, putting in all 26 eyelets was kind of a pain because of the aforementioned problems that I had to work through. But I really liked the result, so I think I’ll definitely have to make a couple more of these.
**If you would like to embroider you’re own fox, leave a comment with your email address, and I will send you the embroidery template.

Have a great weekend!

ps. I’m linking this up on skip to my lou.

Another Fabric Box Tutorial

So, did I mention that I really like my tangram puzzle? A lot. But I knew as soon as I finished the project I would need some way to store the whole thing. Because a neat little stack doesn’t stay neat very long.
I thought I would do a bag at first, like what I used in my chess set, but my sister suggested a box, and after thinking about it, I decided to go with it.

When it came to the design of the box, I wanted to do something a little different. I knew it had to be a fabric box (unsmashable) since my girls would be using it, but I wanted it to have some sort of lid, too. As is often the case, I thought back to my college studies for some ideas (I picked up a lot of DIY skills during my art major). I decided to use an overlapping flap closure from the portfolios I used to make for my printmaking class.

I originally thought a tie closure would be nice, but in the end I decided to go with buttons, because I love hand-sewn buttonholes. Don’t you?

Would you like to make your own fabric box with flap closures (in case you’ve already made up a set of tangram pieces you need to store, or you have something else you want to store with style)? It’s pretty much the same process as making a regular fabric box like the cute ones here and the ones I made here, but the flaps are added in as you are sewing the box up.

  1. Cut out the pieces of your fabric basket. The sizes of each piece will depend on the dimensions of what you’re putting in the box, but you will need to have four side pieces and a bottom piece in the outside fabric, four side pieces and a bottom piece in the inside fabric, and eight pieces for the flaps.
  2. Now you’re going to be sewing your box together. Start by sewing the side pieces to the bottom piece for both the inside and outside parts of the box. You’ll end up with something that looks like a “+” sign.
  3. Then sew up the sides of the box.
  4. For each flap, put your two pieces of fabric right sides together, and sew the flaps on three sides. Clip the corners, and then turn them right sides out. (If you want, you can do some fun little label, stamp, embroidery, or other embellishment on your flaps to identify the contents.)
    (I also did rounded corners, just for fun.)
  5. Clip the corners of your box outside and inside.
  6. To assemble the box, start with the outside box part wrong side out, and then lay the flaps in the box, arranging them face down and pin them in place.
    Then place the inside box piece (right side out) in the outside box piece, so the right sides are facing each other, with the flaps sandwiched between the two.
  7. Sew all the way around the top edge, leaving an approximately 5-inch opening for turning out.
  8. Turn the box out with the flaps.
  9. Top stitch around the top edge of the box to seal the opening.
    This is a little tricky with the flaps, but if I can do it, I think you can too.
  10. The closure method is really up to you.
    I put the buttons on the inside flaps, and put the buttonholes through the two top flaps, but you could put the buttons on the top and the loops on the side of the box. Or sew ribbon into the flaps to tie at the side. Be creative. If you are going to do machine-stitched buttonholes, you should probably sew those on the flaps before you sew the box together.

You’re done. Congratulations. You now have a cute little box for storing your tangrams, or anything else, really. I thought these boxes might be nice for storing photographs, collectible items, memorabilia, felt food, or other handmade toys, or as extra-special gift wrapping for a special gift.

ps. I’m linking this up at skip to my lou and here:
Visit thecsiproject.com

Tutorial: Tangram-esque Fabric Puzzle

This is one of those projects that’s been on my mental to do list for a while, like before I had my Pinterest boards, or I would be able to tell you exactly when and where I saw it. (Oh Pinterest, how did I ever get along without you?) I did pin a similar project as soon as I saw it, but this was months after the original inspiration struck me.

Curious yet? After tumbling the idea around in my head, I finally cracked down and did it, and rather than trying to work backwards to make a tutorial in the event that others might be interested in make their own fabric puzzle, I actually planned ahead on sharing the how-to with you (thoughtful, huh?). And now that it’s done, I’m so glad I took pictures because (a) it is way too cool not to share and (b) I’m not going to be making another set of these things for a while (yes, that means this is a tad labor intensive, but what do you expect when this, this, and this, are my typical project?).

I’m calling these tangram-esque because Merriam-Webster’s definition actually specifies the little Chinese puzzle with seven specifically shaped pieces in the definition of tangram, and this isn’t quite that. But it’s in the spirit of the tangram puzzle.

These are addictingly fun to play with, and I don’t just mean for the kids. My photo sessions got rather drawn-out because I was so into coming up with different designs.


It’s basically a open-ended puzzle that you make up as you go, and I love it. I’m not sure how age-appropriate it is for my toddler and 9-month old, but they pieces are soft, stackable, and colorful, so at the very least they make excellent teething toys and safe projectiles.


I think my older daughter was getting into them, but if not, I’m sure she’ll love them as much as I do in a few years.

Do you want to make your own set of tangram-esque puzzle pieces? Great. Let’s get to work.

The process is pretty simple. You’ll be making a bunch of half-square triangles, sewing a backing and batting to it, turning it right side out, and slip-stitching the opening closed. Here’s the details:

  1. First, choose your fabrics. You don’t need much of each color. I used seven different colors, and only used about 1/6th of a yard each color, and about a third of a yard of the white.
    Really, you can use whatever fabric you want, with as many different colors as you want, and make as many pieces as you want.
  2. Each color is paired with every other color once (7 colors, so the math is 6 + 5 + 4 + 3 + 2 + 1 = 21; I think this works with whatever number of colors you have: take the number of colors, minus one, then add all the numbers to that number and on down), and by cutting the pieces in half (you’ll see later) you get a total of 42 tile pieces.

    If you want to end up with 42 finished squares like I did, you’ll need to cut six 4″ squares in each color, including the white (if you are using a different number of colors, the number of squares you’ll need to cut will be one less than the number of colors you have). For the backing, you’ll need forty-two 3 3/4″ squares in whatever combination of colors you want; I used 18 squares in white and 4 squares of every other color.
  3. Match up one of each color with one of every other color, red with orange, red with yellow, red with green, and so on. If you’re using fabric with a pattern, make sure to keep right sides together.
  4. Use a pencil or a disappearing fabric marker to draw a line from one corner to another.
  5. Sew from one corner of the square diagonally to the opposite corner, using the line you made as the guide for your presser foot.
  6. Turn the square around and sew down the opposite side of the line in the same manner. You will now have to parallel lines of stitching.
  7. Cut each square in half along the diagonal line you marked in step 4.
  8. Press the squares open with the seam pressed toward the darker fabric.
    (I’m sure there are lots great tutorials about how to do half-square triangles. Calli from Make It Do just did a very nice little tutorial about how to do half-square triangles, and it looks very similar to the way I did it, so if you need another tutorial on how to do half-square triangles, check it out.)
  9. Cut out 42 3 3/4″ squares of batting (I cut out twice that because the batting I had was very thin, and I wanted it to have a little more heft.
  10. Lay each pieced square on top of a 3 3/4″ square, right sides together.
  11. Lay your matched pieces on top of one piece of batting.
  12. Sew all the way around your square (1/4″ seam allowance), leaving a 1 1/2″ opening for turning out.
  13. Clip off the corners (sorry, I didn’t show this step, but basically you want to trim to as close to the corner as possible without cutting through the stitching).
  14. Using a turning tool of some sort (I used hemostats, which I read about here), turn out each piece, making sure to push the corners nicely.
  15. Tuck in the open seam, and slip stitch the opening closed. I don’t really know how to describe the slip stitch, I stitched through both sides of the fabric as closely as possible so the thread doesn’t show, then I pulled the thread back through half an inch, made a knot, and “popped” the knot through the fabric to bury it inside (that’s how it was described to me when I was first learning to sew as a teenager, so please forgive my lack of eloquence). Perhaps the pictures will help the description.Repeat 41 times, and you’re done. Now go enjoy your finished work.

They’re great for throwing,

stacking,

sucking on,

designing,

and undesigning.

I hope you enjoy these as much as I do; I’m telling you, hand stitching 42 seams closed is worth it for this little toy. If you make your own, I’d love to see them!

Have a great Monday!

ps. I’m linking this up at skip to my loutatertots and jello, and here:

Visit thecsiproject.com.

Fabric Chessboard

Okay, so maybe it’s a month late, but this is the project I was working on for prudent baby’s “use your words” embroidery contest.

A fabric chess set.

I’ve actually been wanting to make a fabric chessboard for a while now, but it wasn’t until I came across this contest that I could think of a way to do the pieces. I thought about ways to use words (or letters, in this case) literally, and this was what I came up with.

I designed the letters based on a typeface designed by Albrect Dürer and added the pieces’ silhouettes to the sides.

I stitched all 32 pieces with Japanese silk on linen (two of my favorite materials).

My favorite pieces are the knights. Love those little horses.

Each of those little white dots (x’s) you see hold a paperclip in place, which is what the magnet in the pieces sticks to.

I tried simulating the moves to a very short game, but after about five minutes I realized I couldn’t beat myself very quickly.

So, skip to the end, checkmate! (I’m pretty sure. It’s been a while since I’ve really played chess.

I think one of my favorite things about this project, though, is the bag.

I even tried some French seams on the inside (at least, what I think are French seams based on wikipedia’s definition).

This would be great to take along on a picnic or a fun outdoor trip. Just fold it up and pack it along. I had meant for it as a car trip game, but it ended up being a little big for that.

Maybe I’ll have to make a smaller traveler’s version sometime. If I do make it again, I think I’ll try cotton, because getting all the lines straight with the linen was very difficult for my meager sewing skills.

Still a fun, simple (though time-consuming) project. If you want to make your own, leave a comment and I’ll see about uploading a template with the letters if there’s a demand for them.

Have a great day!

ps. I’m linking this up at skip to my lou and here:
Visit thecsiproject.com

Felt Quiet Book

A lot of my projects take a loooong time. It’s not necessarily that I like projects that take a long time, or that I am an especially slow worker. It’s just that when I start a project, I’m loose about the details. So as the project goes along, any new idea that I want to try gets added to it; I have trouble knowing when enough is enough. I don’t know quite how it happens, but it just multiplies and multiples until well, a year later I’m still plugging away at it. The problem is, some of these projects are time sensitive because they are for my daughters, and they are usually age appropriate at the time I start them, not at the time I finish them. In retrospect, I probably should have started these projects way back, before I was even pregnant. Ha!

Well, this is one of those projects.

I’m not sure if my little girl is at the “quiet book” age still, but I hope she’ll humor me at least a little by playing with this thing. Because I’ve spent countless hours working on it. Fortunately, I have another little girl who will be ready to use it in a year or so.

(Another problem that I have is that my projects are usually too nice to let kids play with. Like, it would break my heart a little if she were to wreck it up. But that’s another story.)

I ordered my first round of wool felt for this project back in April 2010 (first round because I ran out of the colors I needed twice. Ahem, did I mention that I also have a problem with planning how many supplies a project requires?). I didn’t actually cut into the felt until June while I was in Ecuador—yes, I packed some craft projects with me on our South American excursion; I thought I might need something to do while the whole country was watching the World Cup.

Anyways, this is kind of a juggernaut of a project, so I decided to break it up into several posts. No tutorials on it, per se, but if you have any questions about my process, be sure to ask. I would love to inspire others with my book.

Here’s a quick look at the inside:

Some of my favorite details are on the back:

Like the buttonhole:

And the dedications for my daughters:

The whole thing is my original creation, that includes all the embroidery designs. I usually started with a sketch or two of what I wanted to make, but I didn’t transfer the design very often, usually I looked at the sketch and sort of followed that as I stitched most of them, but I might be able to create some stitching templates if you see a design you really like and want to try.

Oh, it feels so nice to have this project finished. I’ll be sharing some more details of the individual pages throughout the next weeks. Let me know what you think.

p.s. I’m linking this project up on tatertots and jello.