Felt Hobby Horse

IMG_6430So, I am here. Really. I’ve just been taking a loooong off-screen break. I guess I just needed it. But with the new year, naturally I thought I might be a good time for a blog reboot. A just over year ago I was frantically packing my bags down to the last ounce to prepare to head back to Galapagos.

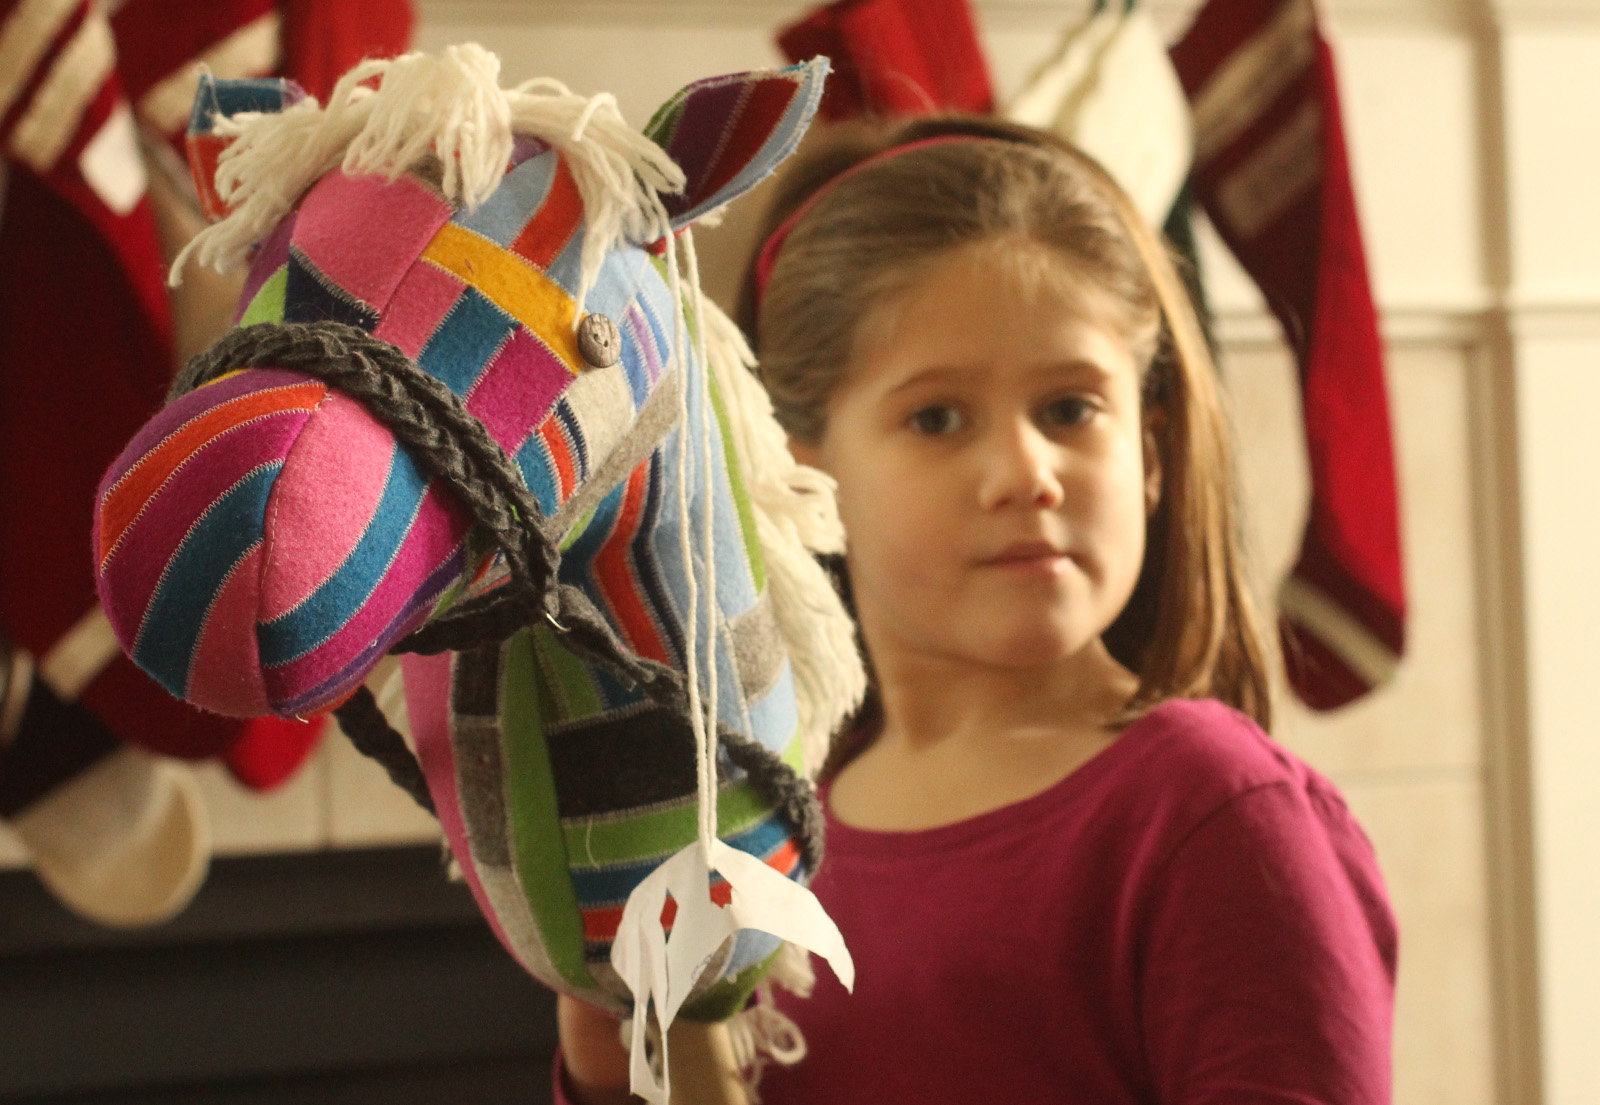
But this year, I have no immediate travel plans. In fact, we might not board  flight the whole year. But that’s okay. We’ve entered a new phase of our lives as a family of five, and we’re settling into it, for the next little while, at least. Anyways, enough talk. Here is a project that I started a year ago, and I’ve just now finished it up. Some scrappy felt hobby horses. IMG_6426 IMG_6400 IMG_6411 IMG_6416 IMG_6419 IMG_6422 IMG_6426Oh, you say you’ve seen this before? Well, you have. But, in case you were interested in making your own, I made a second one (well, I had to anyways, because I pretty much have to make two of everything these days; luckily sweet girl number three hasn’t demanded too much crafting from me yet) and decided to make a tutorial for you guys. 

(Just so you know, it took much longer than I expected it would to put this tutorial together, and I’m sorry if there are any errors; pattern-making isn’t my forte.)

Here we go.

Materials:

  • Felt scraps (a whole lot, in squarish shapes, are best; of course, you can always use whole pieces of felt or really any material you’ll want) You’ll need enough to make approximately a 2-foot square piece of material to cut your pattern pieces out of.
  • Stuffing (I prefer wool for quality reasons, but whatever you want is fine)
  • Thread (you’ll want some heavy-duty stuff, especially for hand stitching on the eyes, ears, and finishing the closure)
  • Buttons for the eyes
  • A 1-inch thick dowel, about 3 to 5 feet long, depending on how tall you want your horse to be.
  • Yarn in a coordinating color
  • Freezer paper (for tracing your pattern, it’s my favorite way to cut out felt)

Tools:

  • Scissors and/or rotary cutter
  • Sewing machine
  • Cutting mat
  • Iron
  • Stiff cardboard or a book, about 5 inches wide and 8 inches long.

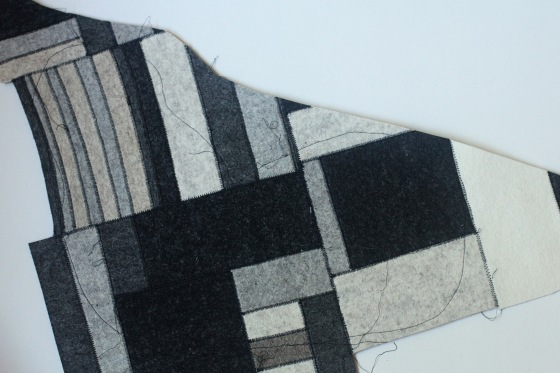
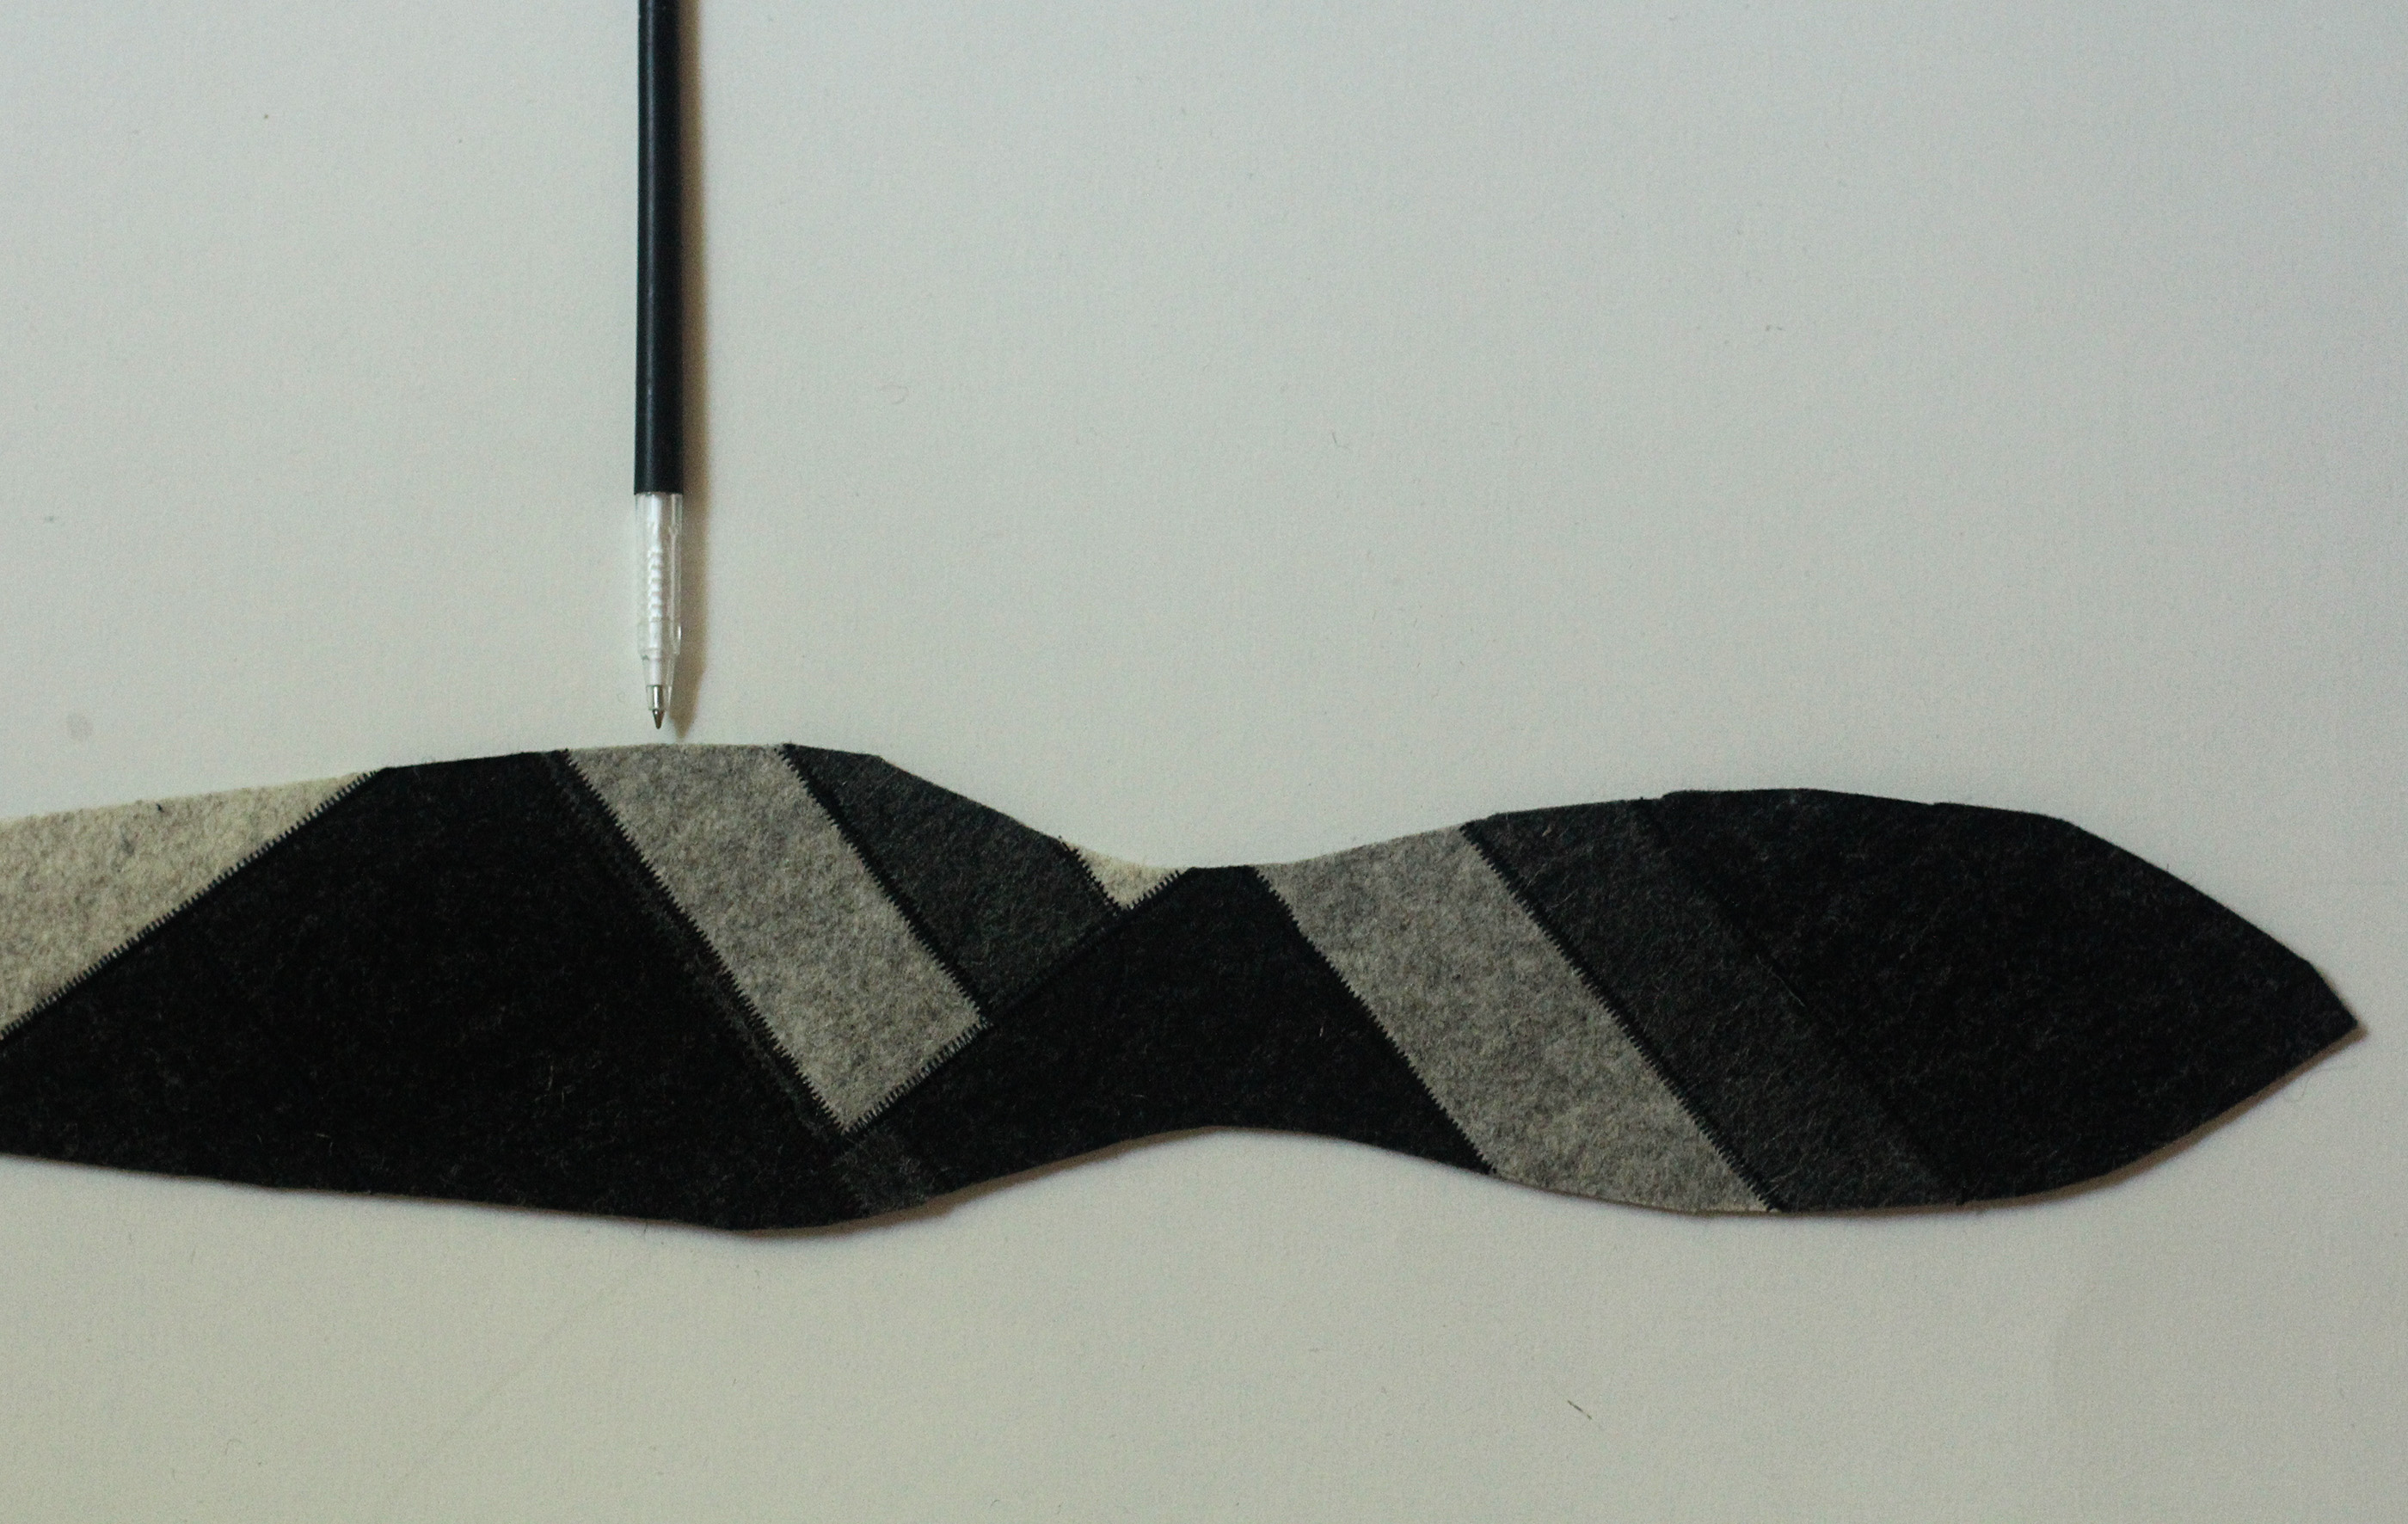
Make your scrappy piece of felt (if you are using a solid piece of fabric or felt, you can skip this part)

  1. Basically, you will be butting up two pieces of felt together and zigzagging over both sides so that the two pieces become one. (See this post for a better explanation)
  2. As you go along, continue building up your scrappy piece with more pieces. I like to make several scrappy blocks and then sewing this big blocks to each other to make your big piece of fabric.

IMG_3149 Cut out your pieces.

  1. Print the template. Click on these links for the four pages of the template: gusset gusset 2 horse neck 1 horse neck 2
  2. You’ll need to choose “print” under the tools menu. I am not a professional pattern maker, so these may look a little rough, but hey, it’s a free tutorial.
  3. Cut out you’re pieces and assemble the ones that are in segments.
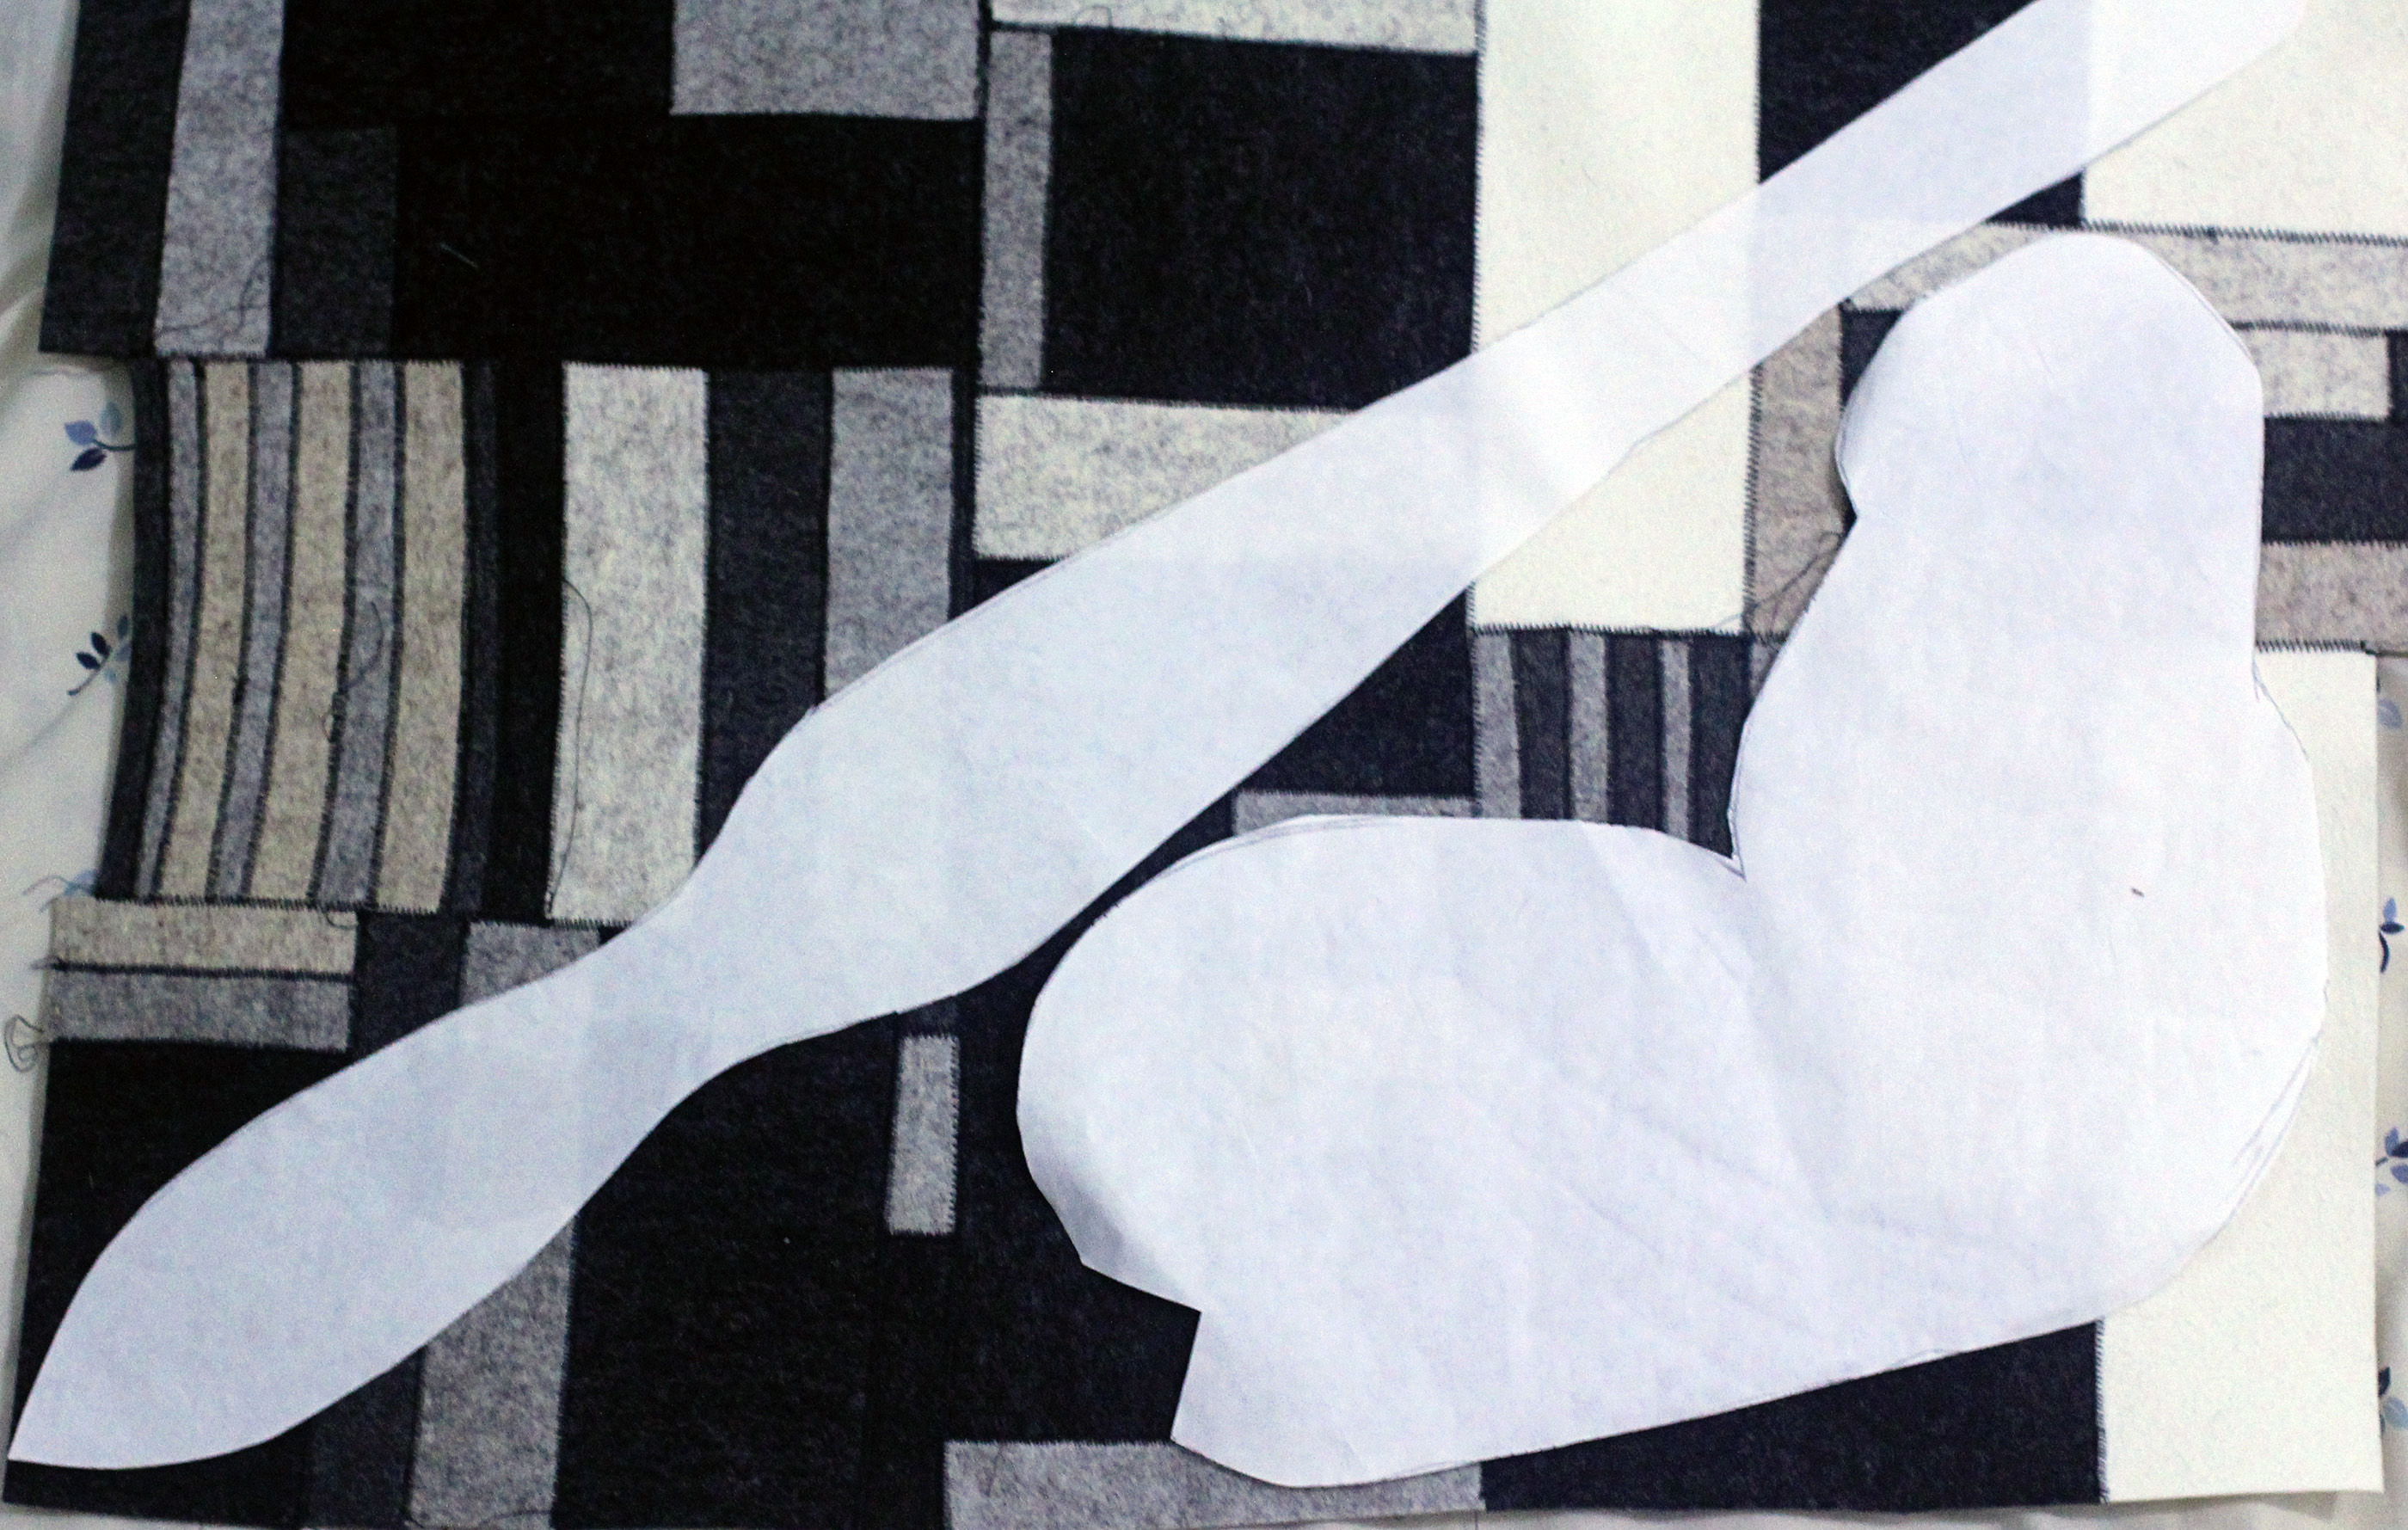
  4. Then, you’ll want to trace your pattern pieces onto freezer paper (ignore the big notch in the horse’s head down in that picture, I was just using a scrap of freezer paper and it didn’t all fit). The long gusset piece is a little extra long to give you some wiggle room when finishing off the opening for the stick, so just keep that in mind.
  5. Arrange your pieces on your felt. I only drew out one horses head, and cut two the same way, since there is not “wrong” side to my felt piece, I could just flip the cut piece and it was fine. If you are using material with a right and wrong side, make sure to do a reverse side of the horses head, too. When arranging your pieces, try to leave about 1/2-inch in between the pieces for your seam allowances.
  6. Once you like the arrangement, iron one of your freezer paper pieces down to the felt.IMG_3164
  7. Baste stitch all the way around your first piece. This is  your way of transferring your pattern to your fabric.
  8. Cut out your first piece, leaving a 3/8ths inch margin around your basting for seam allowance. You don’t need to be too careful about getting perfect seam allowances; you will use the basting to guide your final stitching, not the seam allowances. The gusset piece includes the seam allowance, so just skip the basting and cut right along the pattern piece. IMG_3175
  9. Continue this process of iron-baste-cut for your other pieces.

Now for the mane.

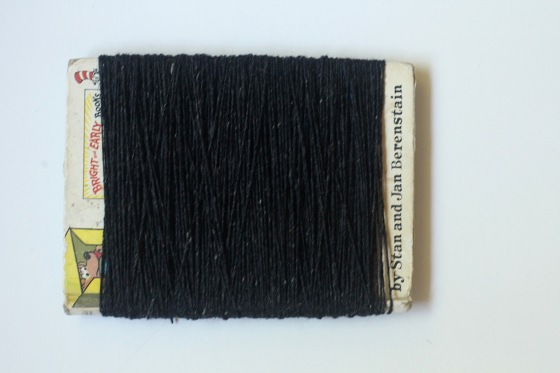
  1. Wrap your yarn around some stiff card board, or a book. It should be about 5 inches wide and at least 7 inches long.
  2. Wrap it a lot, but if you find you still need more yarn for your mane, you can always wrap more, so don’t worry about it too much. IMG_3178
  3. Now cut the yarn along to top. IMG_3184
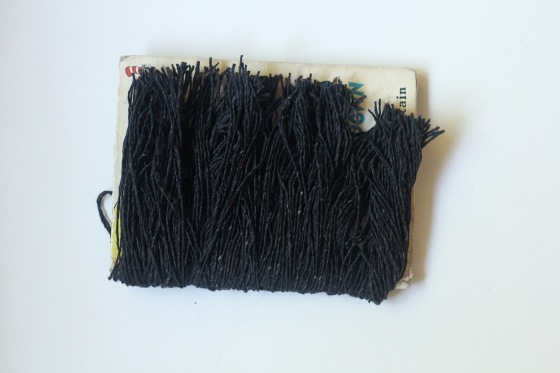
  4. Then cut along the bottom. This will give you a bunch of yarn approximately the same length for the mane.IMG_3186
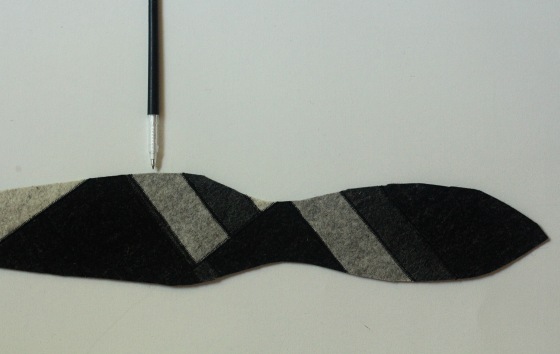
  5. This picture is to show you about where on your gusset piece to start sewing the mane.IMG_3195
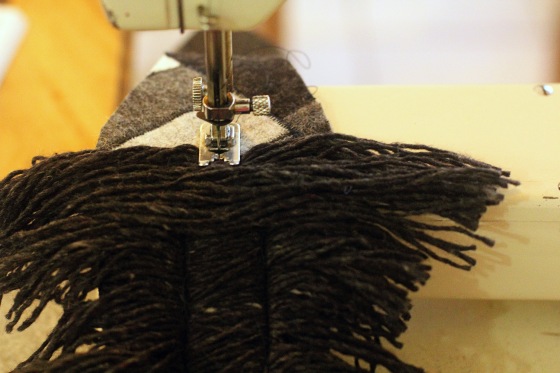
  6. Now sew the yarn down. Start with about an inch bunch of yarn. IMG_3200
  7. Using a small stitch length, start sewing the yarn, about 3/4ths of an inch in from the edge of the gusset. Continue to add more yarn, a couple inches at a time, and sew all the way down till about 4 inches from the bottom of the gusset piece. You’ll want to use about 2/3rds of your cut yarn for this. IMG_3206
  8. Then sew down the other side of the gusset over the yarn, about 3/4ths inch from the left side. IMG_3209
  9. Now finish by sewing 1-inch bunches of yarn right down the middle of the gusset.IMG_3213
  10. When you are done sewing, it will look like this:IMG_3217
  11. Yes, not very mane-like, but never fear. Just start to mess it up with your fingers, and hey-presto, you’ve got a nice full mane going on. IMG_3223

Sew your horse head together.

  1. Okay, here’s where I apologize for the lack of great explanation and pictures for this step. But hey, it’s a free tutorial, so you get what you pay for, right? (nervous laugh) Generally, you are going to sew all the pieces together, right sides together, leaving the bottom of the neck open, and then turn the whole thing out. This is how I did it. I pinned the one side of the horse’s head  to the gusset. The pointy part of the gusset will sit about where the little notch is at the bottom of the mouth, and the rest just follows along the top part of the horses head. Make sure when you pin, that you have the side piece facing up, because you will want to sew along your basting stitch. Also, make sure you have all the yarn from the mane tucked out of the way where you are going to be stitching.
  2. Sew from the tip of the gusset to the bottom of the horse’s head, but don’t sew all the way to the end of the gusset piece. Try to follow your basting line as close as possible. IMG_3228
  3. Now line up the other head side so that it is in about the same position as the sewn side of the head, in relation to the gusset piece, pin, and sew. (Again, follow the basting stitch, and make sure to keep the yarn from being trapped underneath your stitching.
  4. Now, pin the bottom side of the horses muzzle and neck together, feeling to see that the basting stitches of the two sides line up as closely as possible. Sew from the point of the nose gusset down to the bottom of the neck. Actually, I started by sewing about an inch from the end of the nose gusset, up to the point, because starting the stitching with all those layers is hard on my machine. It’s easier for me to get the machine going before powering into that thick part. Then I turned the piece around, and sewed down the bottom of the muzzle to the end of the neck. IMG_3232
  5. Leave about a 4-inch opening in the bottom of your horse head. This is approximately what you’ll have:IMG_3235IMG_3238
  6. Now reach in, grab the horse by the nose and gently turn it right-side out.IMG_3249
  7. Here’s your horse all sewn up.IMG_3254

Finishing your hobby horse. This part happened right before we moved back to the states, so the pictures didn’t really happen as much.  Sorry about that.

  1. First, I transferred the pattern pieces for the ears to the felt using the basting technique I mentioned before. IMG_3241IMG_3242
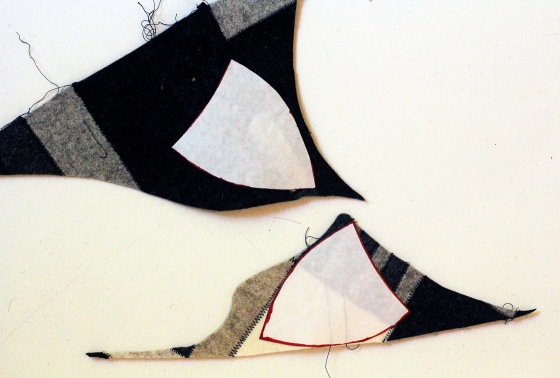
  2. Remove the freezer paper. Then zig-zag stitch all the way around the piece. Then cut it out right next to the zig-zag stitch. IMG_3247
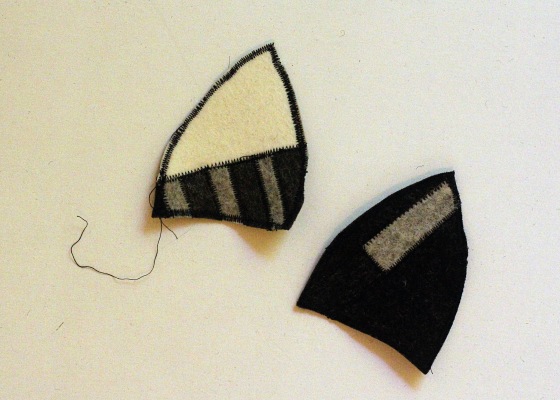
  3. Now here is where you have options. You can leave your ears flat and stitch them on, or you can stitch the bottom corners together and then whip stitch them on kind of sticking out, like I did.
  4. Sew the eyes on like you would any button. Make sure to make it really strong, because little hands will be rougher than you expect.
  5. Stuff that thing. I mean really stuff it. I filled mine with some wool, but you can use fiberfill or whatever you like. I packed the wool in really tightly. Once you get fill to about in line with the bottom of the chin, go ahead and stick the, well, stick, up in there, and pack the stuffing around it. I didn’t use any adhesive or special tricks to get the stick to stay stuck, I just packed the filling tight. Yes, your kid can get it out, but you just stuff it back in, if that happens. If you’ve packed it tight enough, a hollow space for the stick will remain if the stick is removed, as long as you don’t crush the head down after removing the stick. Does that make sense? Hope so.
  6. Finally, you’ll want to slip stitch up the bottom. I just tucked any loose ends in around the stick (if the end of the gusset piece is really long, you can trim it down). Then I slip stitched with heavy-duty sewing thread up and down both sides of the opening to make sure it was really secure. (For some pictures and further explanation of the slip stitch I used, see this post.)

Here they are, ready to ride. You may notice those dandy little felt bridles (my favorite part of the whole project, go figure). Well, those are just some long pieces of felt that I magic braided (but really, you can just regular braid some felt and stitch the end so it stays braided) and then fashioned into a simple loop and halter piece. The d-shaped loops are optional, but they sure add a feeling of authenticity. IMG_6425 IMG_6406Enjoy! Seriously, you might want one for yourself. You’ve been warned. IMG_6412 IMG_6418 IMG_6429

Have a great Wednesday!

Scrappy Hobby Horse

Do you have piles of felt scraps floating around? Felt food, hair clips, fancy flowers, and a myriad of other felt crafting fun can leave you with quite a heap of felt bits floating around. Or, if you can’t get enough scraps, like me, you might purchase a big old box of scraps from some felt supplier. These scraps can come in handy, but I’ve found them hard to use in bulk, until now. I decided to try piecing some fabric together out of all the scraps. After I got about a third of a yard worth, I decided it was time to make something. Of all the different projects I had in mind for this lovely patchwork fabric, I decided a felt hobby horse was most appropriate, because it’s usually made of re-purposed materials (most commonly a sock, but you get the idea).

collage 1

I drafted my own pattern, fully stuffed muslin and all, and then with a few alterations, I stitched up this guy. My favorite part is the mane. It may look involved, but stitching the mane was almost the easiest part (besides attaching the button eyes, of course). collage 2

It’s stuffed firm with scrap wool (i.e., wool that is too short, scratchy or icky to use for anything else). collage 3

Did I mention my little girl is obsessed with horses? She’s already completely smitten, and I think this may be the start of a beautiful scrappy friendship.

This is another project that I think deserves a tutorial, though it might take me a little while to get around to it. Busy, busy, busy. But life is good.

Have a great day.

Dolls for Christmas

dolls sittingThis is my very first finished project of 2013. Never mind that I started it way back last year. I really wanted to make some dolls for my girls for Christmas. Last Christmas they got a some dolls from their abuela that they loved to pieces, literally. Like, the legs fell off of one, and the head fell off of the other. I wish I was kidding. And after watching my poor baby walking around cuddling, cooing, and shooshing a headless doll for a couple months, I decided I needed to take some action. So I made these (hopefully) sturdier dolls.

girls smiling

Now, this could have been a simple project. There are tons and tons and tons of thorough tutorials, books, and patterns for beautiful dolls out there. I even took advantage of the the wonderful public library system to check out some books on doll making techniques. But when it came down to it, I decided that I wanted to make my own pattern for my doll. And I wanted to stuff it with wool. And I wanted to do some of that cool, Waldorf-doll style hair. Like I said, this could have been a simple project. isa playing with hair

doll  2

But as my husband often reminds me, if it isn’t difficult, I won’t do it. Sometimes I think he’s right. So, I used some of the very, very helpful information on one of my favorite blogs, While She Naps, to draft a basic doll pattern. And then another one. And then a third one. After three prototypes (thankfully done in muslin) I decided I’d had enough and would have to go with it. If I ever make more dolls, I’ll definitely want to refine it a bit. It was a great learning experience, though.

And, of course, I decided to purchase a raw wool fleece from ebay to stuff the dolls with. Hmm, I think I’ll just breeze through this whole phase of the doll preparation phase, but lets just say there was so much washing, and culling plant and fecal matter from the fleece, and then drying, and then more sorting, and then combing/fluffing. Bottom line, buying prepared wool is probably worth the extra cost.

After assembling the doll bodies, I had to decide on the faces. Several sketches were thrown out before I decided to kind of wing it as I stitched. I fairly well like how the faces came out. I did the pink lip face first, then the smile face. I had intended to go back and redo the pink lips as a smile, but my four-year-old saw the pink lip doll and wouldn’t let me change it.

all together

When it came to the clothes, I did a very simple dress, but I got a little fancy with the decorative stitching on the hem. First time, and it felt good.
close up dress

more close ups

For the hair, I used some lovely organic cotton yarn which is super soft, but a little fragile, so I had to tell my girls not to try combing the dolls hair. They were a little disappointed with that, but they like having me do braids and other hairstyles on their dolls (since they won’t let me do it on them).

faces

dolls by trees

underwear

Oh, and I stitched on a pair of underwear for both dolls, so there wouldn’t be any doll indecency should they choose to climb a tree or swing on the swings.

doll love

twoSo far the working names are Tully and Sally, but we’ll see if that changes.

If you have any questions about the process, I’d love to share my beginner’s perspective with you. Does anyone else have any first-time doll-making experiences to share? I’d love to hear.

Have a great day!

Fabric Chess Board

Here’s another little project that I’ve been doing a piece at a time since last April. It’s the kind of project that I’ve been thinking about for a long time, mulling over in my head. It really started way back, like last year (summer of 2011) with this project. Yes, another fabric chessboard. I loved  (and still love) that project, but I wasn’t completely satisfied with how it functioned. It was a little off. The pieces were too soft, they didn’t feel like game pieces. So I got to thinking about how I could make it better. The answer that came to me was cover buttons.

So here it is, finally (almost finished):

I quite like it. It’s not completely done, but this was as far as I could get with the supplies I had on hand.

Here’s a look at the pieces. You’ll noticed I simplified the design from the other chess board, mainly to make it a bit quicker to stitch up, and so that it would still read well in a smaller size.

I was able to do enough to create a full tutorial on it, and I decided to publish it (publish is in air quotes here, since it’s just little old me creating a PDF e-book) and sell the tutorial in my Etsy shop.

It’s only $6, and it comes with the pattern for embroidering the pieces and 13 full-color pages of step by step instructions and pictures.

If you make one, be sure to let me know, I’d love to see. This is a project that allows for a lot of creativity, so go for it!

Have a great day!


Tutorial: Toddler Tote

My little almost 2-year-old is going through a phase. An incredibly cute but sometimes irksome phase. You see, she is a little bit of a hoarder. More like a magpie, I guess. Lately, anything that catches her interest, shiny or otherwise, is quickly tucked into a random shopping bag that she drags around with her everywhere. Like I said, super cute, but a little difficult sometimes, when said shopping bag breaks. It causes a slight meltdown. Because of this, I’ve been meaning to make a little bag for her to “guarda” (that’s her Spanish word for putting things in her bag) anything she wants. And since her birthday is this week, I thought I had better do it, already.

So here it is, a little toddler-sized tote (and one for big sister, because you can’t make something for just one of your kids, people!). I roughly measure my bigger little girl (2nd child was sleeping) and then went with a 10 by 7 inch design, with an extra inch and a half for seam allowances (since every seam gets folded over twice).

Oh, I forgot to mention the second reason I decided to make these bags. A year ago, when I was stockpiling supplies for my first year in Ecuador, I purchased yards and yards of this lovely organic cotton grosgrain ribbon (because I love grosgrain ribbon, but hate that most of it is made of polyester or some other artificial material).

So, I also measured this ribbon to make the handles. I just draped it over my daughter’s shoulders and decided where I wanted to cut to make it the right length. Then I cut two pieces of ribbon that length.

The bag construction was pretty straight forward. I started by doing the top (opening) seam. I ironed over a quarter inch (please ignore the fact that I don’t currently own an ironing board and that I’m using an old towel instead). Then I ironed that seam over another half an inch to make a nice finished edge.

Then I tucked the ribbon under this seam, pushed up right to the crease in the fabric. Make sure you don’t twist your ribbon when you put it in.

Sew an 8th of an inch in from the bottom fold. Then flip your ribbon up and sew an 8th of an inch in from your top fold. When you’re done, your inside top seam will look like this. And the outside will look like this. Isn’t that nice?

And the outside will look like this. Isn’t that nice?

Thus ends my contribution of helpful pictures to this tutorial-ette. From here, is just got too caught up in sewing (and entertaining kids while I sewed) that I didn’t take any more pictures until I was done. Here’s what I did. I sewed the bag with French seams all the way around (Google French seams if you need help with this; it’s pretty straightforward, so don’t be scared off by the word French. You can refer to them as freedom seams if that’s your boat). Then I cut off the corners, and did those as French seams too. The cut of the corners part is hard to explain, but if you’ve ever made a boxed corner bag (my own term, sorry) of any sort, you probably know what I mean. If not, check out this great tutorial for the run-down on boxing out your corners. Of course, this step is just optional; the tote works fine without boxed corners. The benefit of boxed corners is that the bag will stand upright when you set it down, which is a big plus when you’re a little person trying to fill a bag as full as you can by yourself.

Here’s what the French seams business looked like on the inside. Lovely, right?

And here’s the finished tote. I did a little nuno-felted initial, but I’m not entirely satisfied with the freehand felt typography here. Oh well, my little girl loves it. So I’m happy. Of course, I should have a picture with the little model, because she sure is cute with her little tote. Sorry about that.

Have a great day!

Felt Modular Storage

If you were to skim through my archives, you would probably see that it’s no secret that I love felt. Let me get that straight. I love 100% wool felt. I’m a felt snob, I guess. I think it is one of the most perfect creative materials ever to come into the hands of man.

Before I left for the island, I stocked up on some really wonderful 100% merino wool felt (I used some of if for this project). And now that I have some time and  great little studio space, I’ve been dreaming up ways to use it up. One of the first that came to mind was some storage space for the never ending supply of little things that find there way onto my desk. Pencils, scissors, thimbles, etc., that just never want to stay in their designated drawer, no matter how often I put them there.

So I came up with this.

It was a lot of hand sewing, to which the callouses on my fingers can attest.

I figured out, half way through, that some rubber finger tips made the job go easier, but it was still pretty tough.

I even broke one of my favorite curved needles, which made me sad.

But all the work and pain was worth it. I love it.

I played around with the arrangement, and finally decided to go with point-side down (though, if it had been a little more practical, I would have totally gone with the leaning side position).

This is made with scraps of 5 mm felt. It seems pretty sturdy. I would have made it bigger (meaning, adding more triangles the same size) if I had more big scraps. Maybe I’ll have to pick up some more felt while I’m in the states.

Have a great day!

Curtains

I made curtains. Eight, fully lined curtain panels to be exact. Two for every window in our home (well, not including the kitchen window, but I ran out of fabric, and those are small windows anyways). That was a big, big project that I made even bigger by first hand stamping (with cut up potatoes and cardboard tubes) the fabric for the panels. And ironing. So much ironing. Which becomes a lot more when you don’t have an ironing board so you spend hours crouching on the ground ironing over a doubled-over towel. But now that they are done, I’m really pleased.

I used this great tutorial, and it was really helpful in getting me going in the right direction. I didn’t use a sheet for the lining, since I accidentally bought twice as much fabric as I needed. But I did have to piece some of it together to get it all done.

I even had a little bird (one of Darwin’s finches) join me for a bit of sewing. It just adds a little bit of magic to your day.

About the stamping. It took a while, but it was pretty straightforward. I just used some acrylic paint, since that was all I could find at the craft store on the mainland. I wish I could have gotten something a little better, since it started to rinse out a bit when I washed it, even after heat setting it. So, there’s a lesson learned. The second lesson I learned on this project was that when something is going terribly wrong, don’t keep going. Stop and fix the problem. I learned that the hard way when I went to sew my first panel and the fabric was ruffling and puckering like crazy. I just kept thinking, I just have to keep going, and by the end, I had a horrible, completely wonky (not in a good way) panel. It took me a little while, but I figured out that it was the thread tension. Against my better judgment, I realized that I had to set it to 0 up top to avoid puckering. I still don’t know how that works, with no tension on top, but it was the only thing that could stop the ruffling, so I just went with it.

Here they are hanging up. When I had finished sewing them, I wasn’t sure if I liked them, but now that they are hanging, I am so glad I stuck with them and got them done.

Have a great weekend!

How to Make a Scrappy Felt Clipboard: Mini Tutorial

Here’s a quick little project that I whipped up in a little over an hour. I’ve been wanting to make something like this for a while, and  time, materials, and ideas all met in perfect alignment last week, so I just whipped it up. What is it, you may ask? A scrappy felt clip “board.”

It was super simple. I just zig-zag stitch (with the widest stitch width possible) the pieces of felt together. Don’t overlap the edge, just make sure they are cut straight, and then butt them up together as you feed them through the machine. This is made with some scraps of beautiful 2 mm 100% merino wool, but it would probably work just fine with whatever kind of felt you use.

I then used my pinking rotary cutter (I thought it echoed the stitching nicely, but you could use a regular rotary cutter, or pinking shears) to even out the edges. Then I sewed a strip down the middle, and tacked it down at intervals, so there was a place for the clips to go. To hang it, I added some loops of felt and then put a nice piece of driftwood through them, then tied them with a little string and hung it on a nail. Sweet and simple.

Here it is load up with the material I intended it for: some of the things I’m using to teach the little girls.


Good luck with your own clipboard. Have a great day!


A Few Little Things

Christmas and New Years flew by in a blur, and now I’m battling a nasty stomach bug, so I’m not feeling up to much. I just thought I would share a few little things with you. First, Christmas. It was small, on my part, very small. I whipped up a couple of little felt lovelies for my daughters. With life and our future living situation still up in the air, and living out of suitcases for the last month, I didn’t want to add too much to the toy load, but I did want to give them a little something to make this Christmas special. First, my older daughter is OBSESSED with horses.

So a little felt horse finger puppet was an easy choice.

My younger daughter’s tastes are a little more simple, so I went with a nice little felt ball. It’s fun to chew on and to throw.

With the year before me a complete unknown, I decided to ground myself with a few goals (resolutions) that I want to make happen. I even wrote them down, in a nice little word-collage, but of course, I forgot to photograph it, and now it’s dark, so I decided to let the post go without a picture. My goals are mostly small, but after all, it’s the “small” things that make life wonderful.

Anyways, I hope you all have a wonderful week. Hopefully I’ll be feeling up to posting something for real next week!

Tutorial: Sewing Fabric “Block” Animals

***Just a reminder, the giveaway for the 3-piece nativity set is still going on, and there are a few full copies of the nativity template left and you can now purchase the full template in my brand new Etsy shop. Be sure to leave a comment on that post to get a chance to win and to get your free template.***

So, you’ve got your Nativity template, and you’ve been happily stitching away, and now you want to make those little guys into fabric block animals (like wood block animals cut out with a jig saw). Well, it’s a pretty simple process, so for all you seasoned sewers out there, just scroll down to admire the finished product. But if you’re like me, still feeling my way around the sewing thing, then you might want a quick tutorial to get you on track.

First things first, I got a question a little while ago about what kind of fabric I used, and my answer is a medium weight 100% natural colored linen from Joann’s. Nothing special (but if I had unlimited resources, I would have liked a nice, expensive, made specifically for embroidery linen). I also think a good cotton (Kona is my preferred choice) would work perfectly well, too.

  1. Once you have your image embroidered, you are going to want to remove any marks you may have used to create the pattern, then iron your piece flat (I use a scrap of muslin when I iron my embroidery to protect it).
  2. Then lightly trace an outline about 3/4th’s of an inch around your piece. I like to keep my border fairly well-rounded, because tight curves are much harder to sew (maybe that’s just me, though).
  3. Cut around this traced line. You can use a good, sharp pair of scissors, or lay your fabric down on a self-healing mat and then carefully cut around it with a small rotary cutter.
  4. Lay your cut-out piece on top of your back embroidered piece, or just on another piece of fabric if you don’t want your block to be double sided, right sides together. Make sure to line up the two designs as closely as possible ( I feel for the “ridges” made by the embroidery).
  5. Trace the outline on your back piece of fabric and cut it out. If you are using a rotary cutter, you can skip the tracing step, and just follow the outline of your top piece as you cut out the back.

  6. Cut a long strip of fabric, making it the width you want your finished block to be, plus a 1/4 inch seam allowance on both sides. The length will vary depending on which figure you are sewing, but you’ll probably need at least 18 inches, to be safe.
  7. Sew the long strip all along the right-side edge of one side of your piece.
    You can pin it if you wish, but I found it easier to just manipulate the fabric around as I went.
    Leave at least a 1-inch tail at the beginning and end of the strip, and leave a slight gap between the beginning and end of your stitching so you’ll have enough room to turn it out later.
    (I didn’t leave extra room, so my fabric tore a little when I turned it out. p.s. I didn’t mean this to be a close-up of my pomegranate-stained finger. Sorry about that!)
  8. Pin you other side to the edge of your strip, with the right side facing in. You’ll want to make sure you’re laying over the other side in mirror position so the sides will be straight look right (sorry if that’s a little confusing. I couldn’t figure out a better way to word it, so just look at the picture.)
  9. Sew all along the edge, with a 1/4-inch seam allowance. Your stitching will be parallel to your previous stitching along the side strip.
  10. Turn your piece out. If you are using hemostats or any pinging implement, try not to grab your embroidery, go for a blank piece of fabric.
  11. Stuff your piece with little pieces of poly fill, wool, or cotton. I like to stuff mine pretty firmly.
  12. Leave a little room in the bottom to pack in your weighting implement. This can be a few fishing weights, some beans, rice, or anything heavy, small, and nonperishable. If you want, you can sew a narrow weight “pouch” out of a scrap piece of the side strip and fill it with your weighting device, then stuff the pouch into the bottom your piece; this method helps keep all the weights at the bottom. Something to keep in mind: the bigger your piece, the more weight you’ll want right at the bottom to keep it upright. I didn’t get quite enough weight in my donkey to keep it really stable, so it’s a little wobbly, but it works.
  13. Once you have your weight inside, sew up the opening with a ladder stitch (see my tangram tutorial for an example of that—I think I called it slip stitch there,  or just google it).

You may have to smoosh it around a bit to get it to sit right.

You’re done! (Only 23 to go. . . .) If you don’t have a nativity template, go get one here, or use whatever design you want for your fabric blocks. Enjoy!
ps. I’m linking this up at the weekend wrap-up party and at skip to my lou.